
My first child started attending a Montessori preschool just before his 3rd birthday. One of the tools which his teacher said he had trouble understanding was the Montessori pink tower. After I looked up what a “pink tower” was, I just couldn’t believe that my son was unable to stack blocks in order of size. However, I was also unwilling to pay nearly $40 (Affiliate Link) to prove to myself that he could.
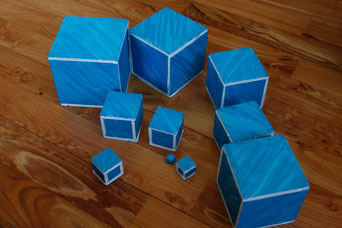
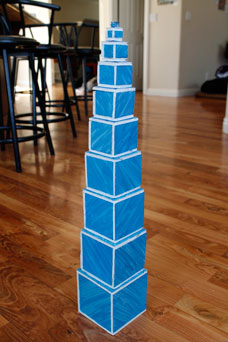
After several months, when my son was three and a half, his teacher was still saying he was unable to do the pink tower. Still unable to believe it, I decided to make one myself. I was actually pretty pleased with the result (and the total cost of under $5). However, I was a little disappointed with the amount of time he spent using it. I asked him to show me he could do it and he stacked the blocks in the correct order, but completely forgot about one of the blocks. I showed him he forgot one and he did it again correctly the second time.
In my opinion, his problem was more of an attention span issue than a stacking issue. Since he never really used them again, I’m hoping they’ll come in handy when my 2 year old is a little older.
Note that when I’d completed the tower, I basically just gave him the blocks and said, “Do it.” After all, he’d seen them at school. However, if you’re interested in introducing the pink tower to your child in a way that wouldn’t make Maria Montessori cringe, check out this tutorial on the correct way to present this learning tool from Carrots are Orange.
Recommended Age Range: Preschool
Time Required: ~3 hours
Difficulty: Fairly Easy (all the measuring with a ruler is time consuming and using the x-acto knife requires attention and care, but otherwise, the process is simple.)
Cost: Less than $5 in used supplies (I forget how much the large sheet of foam board cost, but I’m sure it was less than $5 and was the only real cost.)
Materials:
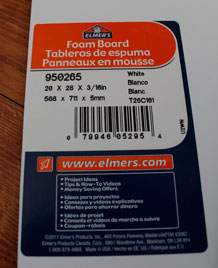
- Foam board (I used a 20″x28″x3/16″ or 508 x 711 x 5 mm sheet, but I had quite a bit left over)
- Tacky glue
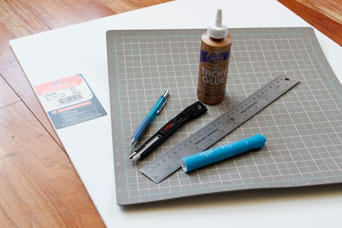
Supplies & Tools:
- pencil
- ruler
- x-acto knife
- surface for cutting (I used a self-healing mat)
- marker or paint (unless you buy colored foam board, which would have saved time, or you want to leave it white)
Instructions:
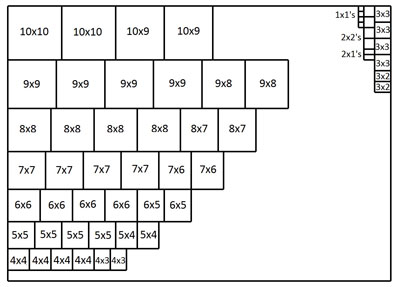
- The first step is to trace out all the square and rectangular shapes to be cut to make the blocks onto the foam board using a ruler and pencil. Going along with standard Montessori specifications, my largest cube was 10 cm on each edge and my smallest was 1 cm. Since the foam board itself has a thickness of half a centimeter, all the sides of each cube are not the same size. For example, the 10 cm cube is made of two 10 cm x 10 cm squares, two 10 cm x 9 cm rectangles, and two 9 cm x 9 cm squares. The 1 cm cube is made by stacking and gluing two 1 cm x 1 cm squares. Here is a diagram of the shapes that I drew onto my foam board in centimeters.
- Cut out all the shapes using an x-acto knife on a safe cutting surface, like a self-healing mat.
- Color or paint one side of each shape if desired. Although the standard Montessori tower is pink, I like blue better.
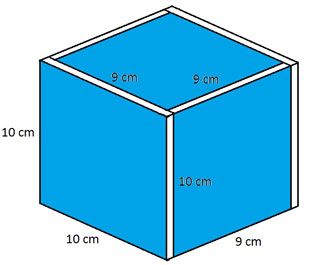
- Glue the shapes together to make each cube. As stated before, the 10 cm cube is made of two 10 cm x 10 cm squares, two 10 cm x 9 cm rectangles, and two 9 cm x 9 cm squares. This diagram shows how they are assembled.
- Similarly, assemble the 9 cm cube using two 9 cm x 9 cm squares, two 9 cm x 8 cm rectangles, and two 8 cm x 8 cm squares.
- Assemble the 8 cm cube using two 8 cm x 8 cm squares, two 8 cm x 7 cm rectangles, and two 7 cm x 7 cm squares.
- Assemble the 7 cm cube using two 7 cm x 7 cm squares, two 7 cm x 6 cm rectangles, and two 6 cm x 6 cm squares.
- Assemble the 6 cm cube using two 6 cm x 6 cm squares, two 6 cm x 5 cm rectangles, and two 5 cm x 5 cm squares.
- Assemble the 5 cm cube using two 5 cm x 5 cm squares, two 5 cm x 4 cm rectangles, and two 4 cm x 4 cm squares.
- Assemble the 4 cm cube using two 4 cm x 4 cm squares, two 4 cm x 3 cm rectangles, and two 3 cm x 3 cm squares.
- Assemble the 3 cm cube using two 3 cm x 3 cm squares, two 3 cm x 2 cm rectangles, and two 2 cm x 2 cm squares.
- Assemble the 2 cm cube using two 2 cm x 2 cm squares, two 2 cm x 1 cm rectangles, and two 1 cm x 1 cm squares.
- Assemble the 1 cm cube by gluing two 1 cm x 1 cm squares together.
Related Links
Homemade Montessori Learning
Best Books for Preschoolers
Pre-K Learning

free files to “print” them on wood in the laser cutting service
https://www.thingiverse.com/thing:2766532
https://www.thingiverse.com/thing:2763806
That’s so cool! Thanks for sharing. I’m not sure how laser cutting services work, but that would be so convenient!
I made this for our homeschooling. I glued poster board paper on top and covered with modpodge. Looks great! Thank you!
Could you share a picture of this? Mine came out crazy looking and if like them to be a bit neater
aww this is nice. I made a front facing bookshelf using the same foamboard (we’ll see how long it lasts but for $3, i mean….) Has your son gone back and used it since you posted? I think making it super cheap out of foamboad will take the sting out if my daughter (she’s 16 months) wont use it a lot. Also, when you store it– do you store it together or seperated?
Hi Aana! My oldest that I made this for is nearly 12, so I haven’t had this for a while, lol! I remember we used to keep it stacked in the corner of our playroom and a couple of my kids used it, but all in all, I was pretty glad I didn’t spend a lot of money on it, because each kid probably only did it a handful of times!
This is a wonderful idea as Montessori materials can be so expensive. I would go a step further to fill each block with a filler to mimic the weight of the original wood blocks. However, one thing to understand is that Montessori materials are made with great intention. The pink tower is not simply about a child being able to stack blocks. There is the 3d aspect, dimensional differences, language to teach (smallest, largest, heaviest) etc. There are also extension activities for the pink tower. If you have to use these materials at home, please look into the correct way to present the materials. Also it is important to not correct the child during the presentation as Montessori materials have a built in control of error. The child will realize the error on their own or the material can be presented at a later time.
Thanks for your advice and contributions, Bella! It sounds like you have a lot of experience with Montessori education. It’s hard to believe I wrote this post 11 years ago! My baby will be driving in a month. 🤪 Where does time go? I admit that we are long past Montessori preschool activities in our house, but I hope to have grandkids one day. I love the self-correcting nature of Montessori materials, so I hope I will get a chance to use them again at some point in my future!
Wow thanks so much for replying even though you posted so long ago! I finished tracing and cutting out all my squares and rectangles (quite satisfying!). Now when I am attempting to assemble the 10cm cube, it seems uneven. My foam board also has a .5cm thickness as yours did. Is there any possible way you have a record of how you assembled the cube (the 9×9 square seems a bit small to cover the cube.) Thanks so much again for your time!!
Hi Bella! Unfortunately, I don’t have any documentation of how I made it at this point, other than what is in the blog post. Based on the diagram I made back then though, shwon after Step 4, it should work out mathematically if the walls are actually 1/2 cm. The 9×9 should be completely inside the “tube” made by the two 10×10 and two 10×9 walls. I would have put glue along each edge of the 9×9. Maybe your walls are not exactly 5 mm? It should be pretty close, I would think, and given that it will be used by a small child, if it were me, I wouldn’t worry too much about it. It will probably take a bit of a beating anyway! 😜 Enjoy your weekend!
I completed the cubes using your exact measurements and the project turned out amazing! I was confused because I assembled the pieces incorrectly the first time. Your instructions were so detailed, I feel so proud that I made this instead of purchasing and I have you to thank for that!!
Awwww! I’m so happy to hear that, Bella! I’m glad it worked out! ☺️