This post is the fourth in a series of posts about getting started using the LEGO Sprike Prime robotics kit. The first was our unboxing, then we went over how to test the motors and sensors. Third we covered how to install the app and make sure you can connect the hub to Bluetooth. This post will cover how to write a program for the first time, transfer it to the Spike Prime Hub, and generally manage your files.
The reason why I myself am learning how to use a Spike Prime is because I would like to try coaching a FIRST LEGO League Challenge team for 4th to 8th graders. Literally anyone can do this regardless of your educational or professional background. This program seems like it will be such a fun and valuable experience for the kids. I am hoping to have a team of 8 to 10 kids (including my 3 kids that are currenty in that age range).
However, whether or not you want to officially compete at a FIRST LEGO League tournament, one of these kits is a great way for kids to have fun learning robotics, engineering, and especially programming. I worked as a computer programmer for the Air Force for over a decade and didn’t start learning computer science until I was 18 and in college. An experience like this would have given me such an incredible headstart.
If kids are already familiar with MIT’s free programming language, Scratch, they will find the transition to programming LEGO robots seamless. My kids all learned Scratch using Code Your Own Games! by Max Wainewright. I highly recommend this book for those just getting started with Scratch. Here is my full review.
When I started making this Spike Prime series, after I installed the app and learned how to connect to Bluetooth and transfer files, I was actually planning to move next to building a robot that we could program. However, I quickly realized that learning how to manage files was going to be an important step that didn’t come naturally for my kids. They tend to not remember to even name their programs. However, as a computer scientist, I can attest to the importance of implementing some sort of naming and organization strategy. I’m hoping this post will help with that!
For your convenicene, here is the entire LEGO Spike Prime Tutorial Sequence. I am hoping I will remember to come back and update this as we go!
- Tutorial 1: The Unboxing
- Tutorial 2: Testing the Motors and Sensors
- Tutorial 3: Installing the App and Connecting the Hub
- Tutorial 4: Writing and Managing Programs
- Tutorial 5: Building the First Robot Car
Writing and Managing Spike Prime Programs
Recommended Age Range: Elementary, Middle School, High School
Time Required: About 20 – 30 minutes
Difficulty: Easy
Cost: The LEGO Education Spike Prime Set costs $400 on the LEGO site. As of this writing, it is more expensive on Amazon, but I would check!
Instructions
- The first step anytime you would like to write a program is to launch the Spike app. I am a Windows user, so I’m not sure how these instructions will differ on a Mac, but I have a shortcut to the app on my desktop. I could also search “Spike” from my list of applications.
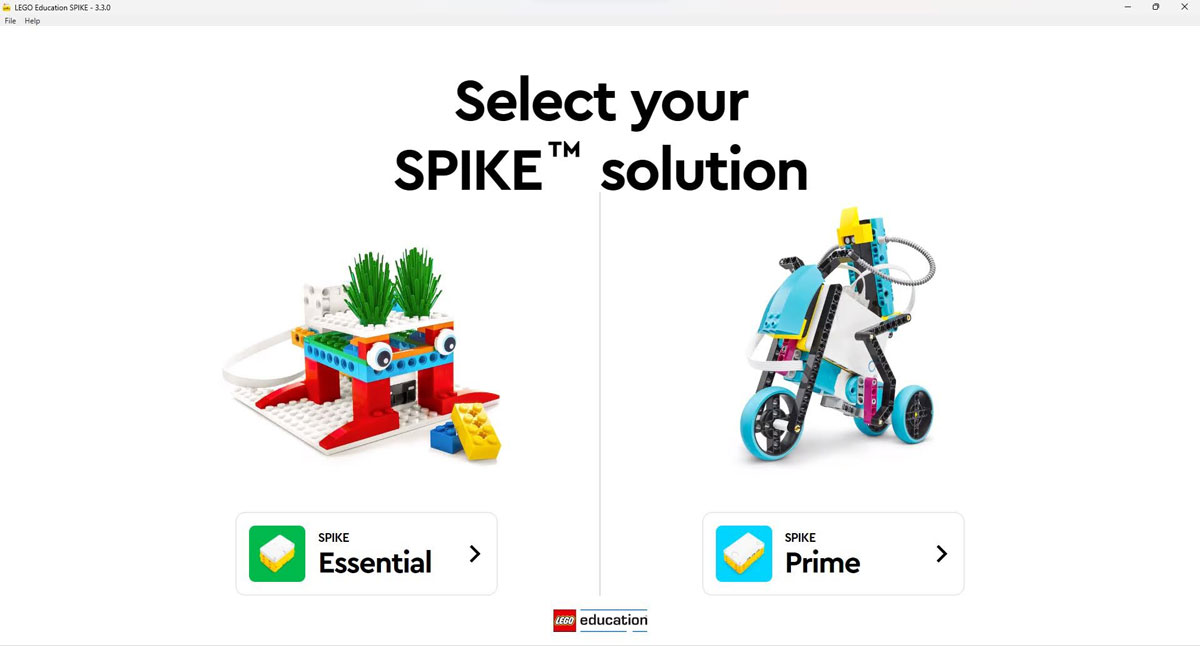
- Once you launch the app, you should see the screen below. Select Spike Prime. You will also have to confirm that you have everything you need (namely, the Spike Prime set).
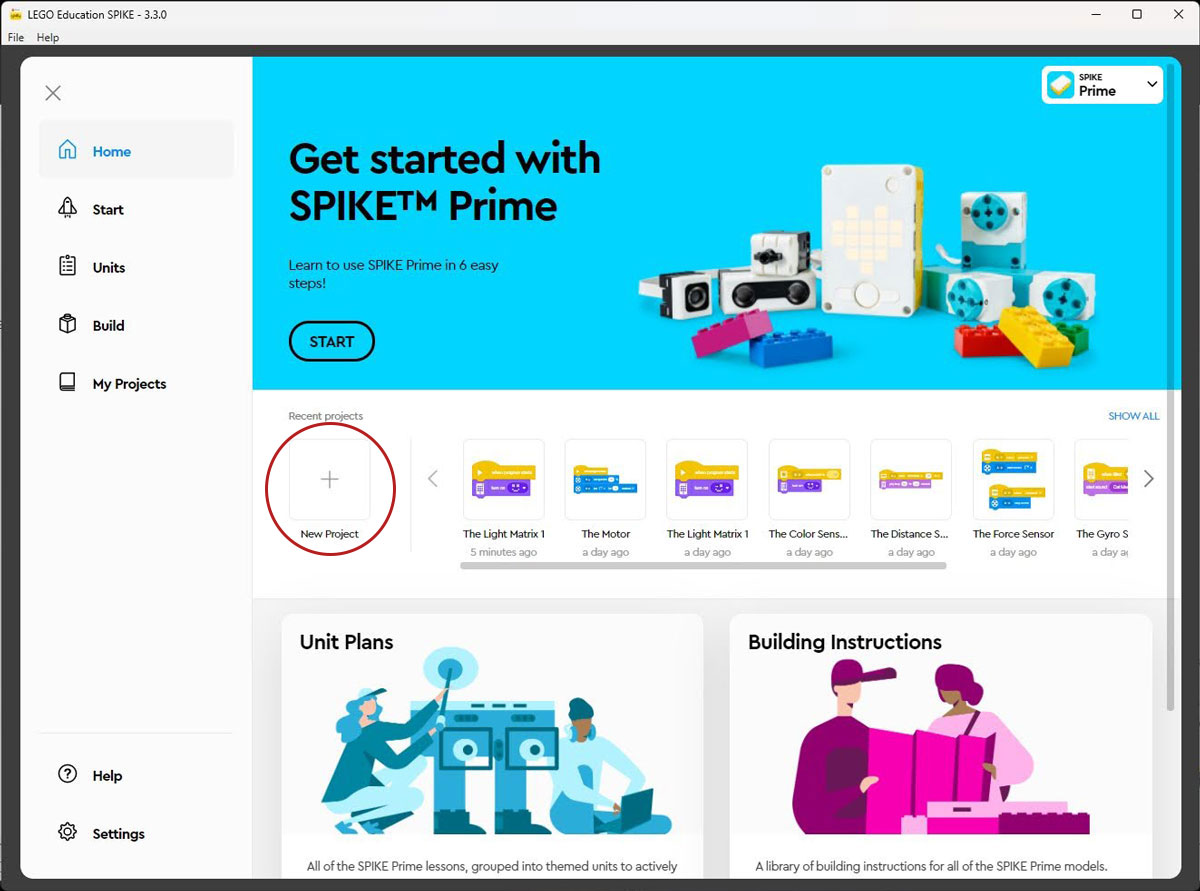
- To write a new program, click the “New Project” button in the middle of the screen. Notice that to the right of this button, it is showing all of the recently created projects. We will clean these up in a bit.
- Next it will ask you what type of program you would like to create. I LOVE that they have multiple options. The icon blocks are supposed to be good for kids who don’t even know how to read. Since my 4th through 8th graders can read, I am planning to start them off on Word Blocks. They will feel right at home if they have any familiarity with Scratch. I am so happy that it has a Python option as well. My 8th grader has started to learn Python and it is a language that I used regularly in my job as a computer scientist.
To start, click “Word Blocks.” You can always try the simpler icon version or more advanced Python version later. Note that in faded letters you can see that the program will be named Project 1. You could name the project something more applicable here, but I am going to skip it so that I can show you how to rename the file later if you forget. (Which, I promise, my own kids will.)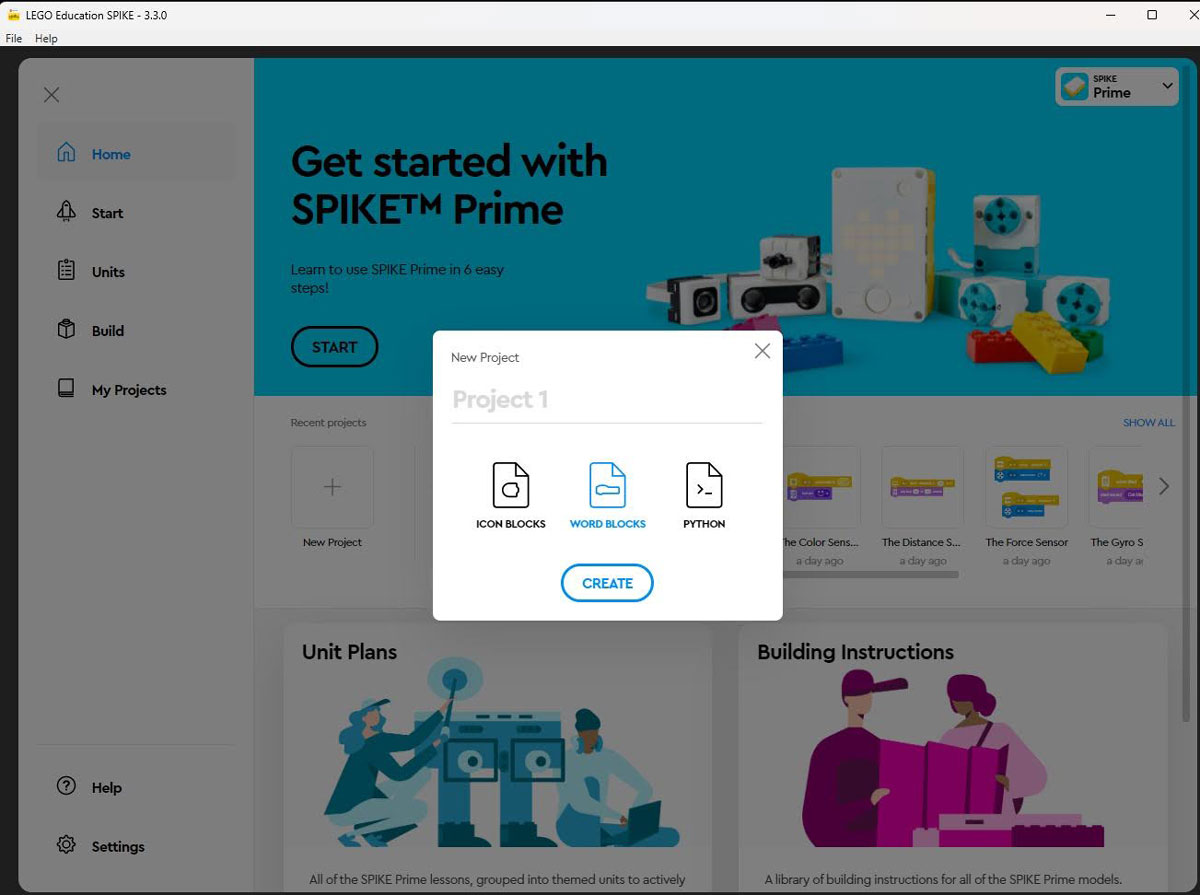
- In order to be able to test our program, we will need to have the Hub connected. You can always do this using a cable, but the cable isn’t necessary as long as your computer has Bluetooth.
Before you connect the Hub, press the power button on the Hub and then the Bluetooth button in the upper right. Also, be sure that Bluetooth is enabled on your computer or tablet.
Then, click the yellow button with the Hub icon inside to open the Hub connection.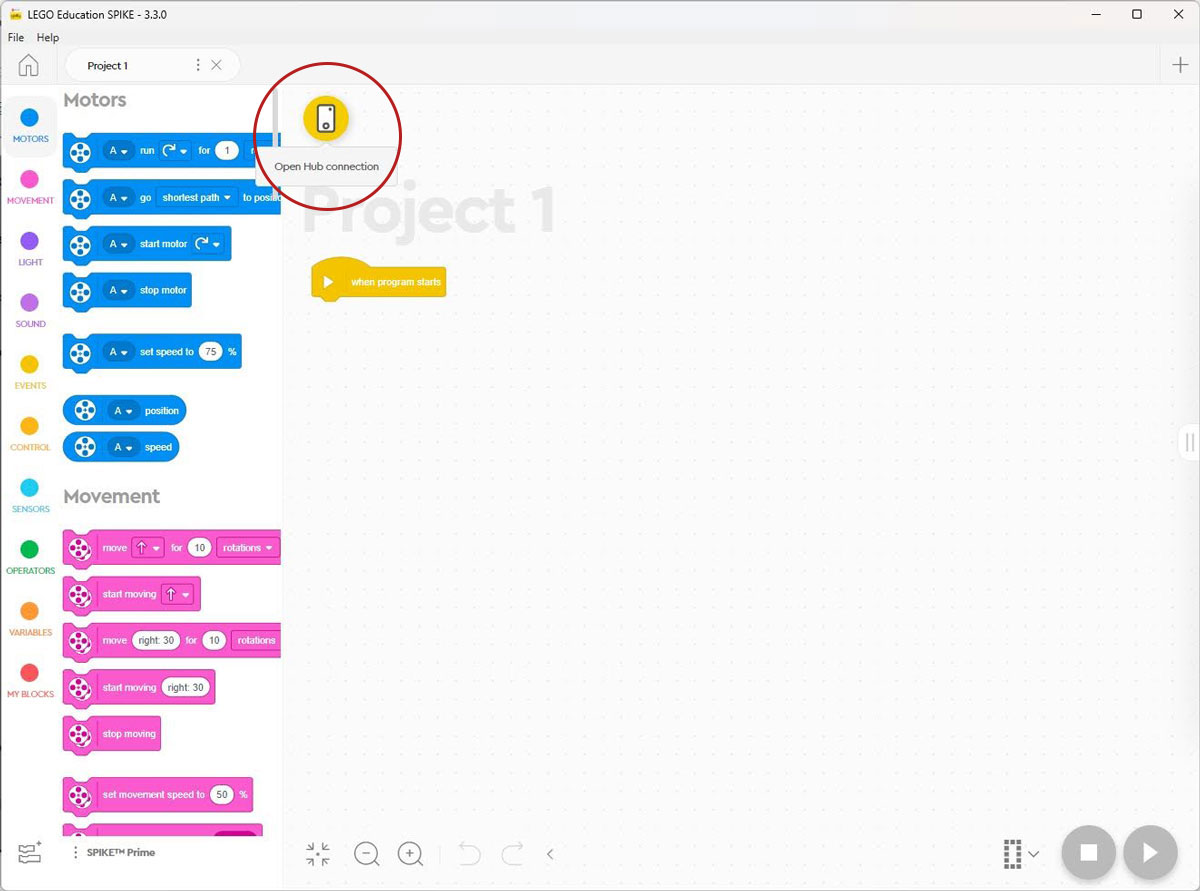
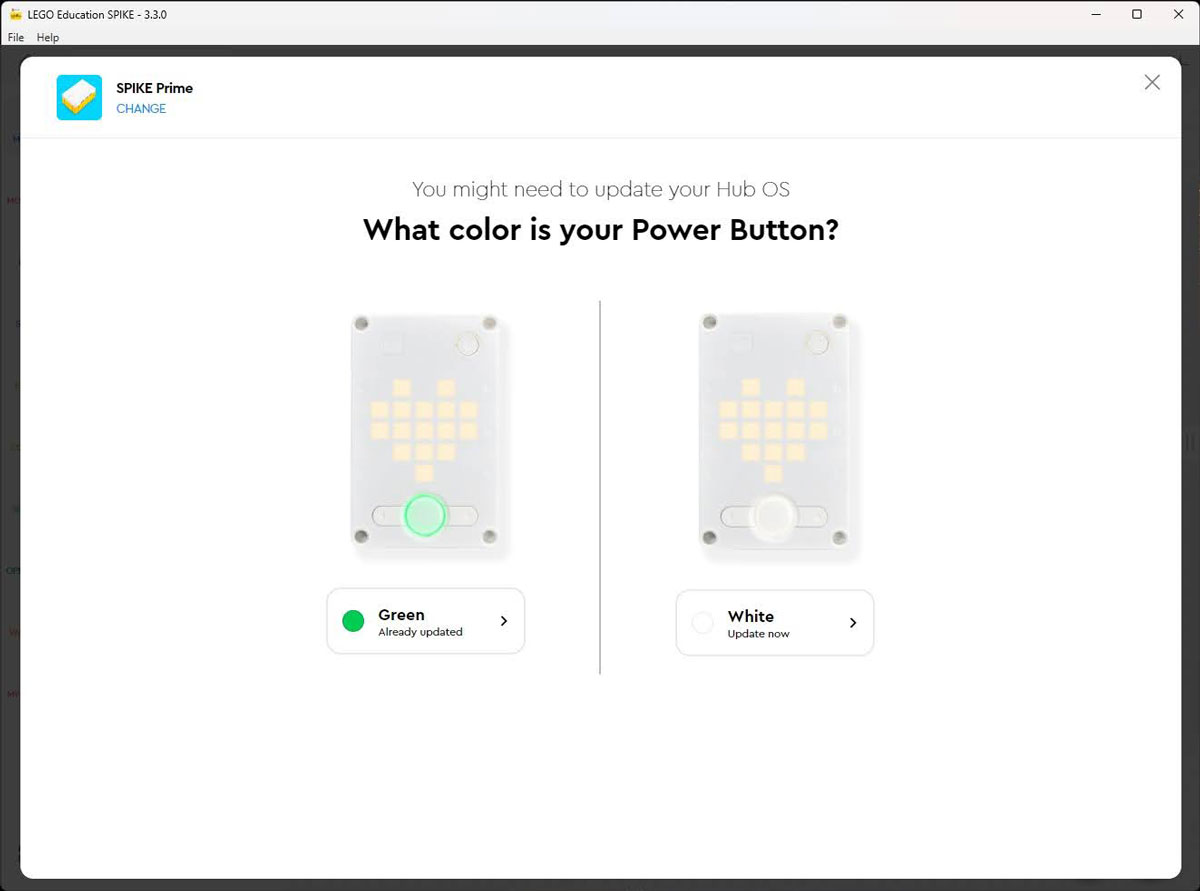
- The app will then ask you what color your Hub’s power light is. We just updated our Hub recently, so our Hub is green, but if at any point it needed an update, we would select the white button to receive the update.
- Assuming you have already enabled Bluetooth on your device, turned on your Hub, and pressed the Bluetooth button, it should find your Hub and show it listed on the right side of your screen. Ours is named Stuart. Press the Connect button.
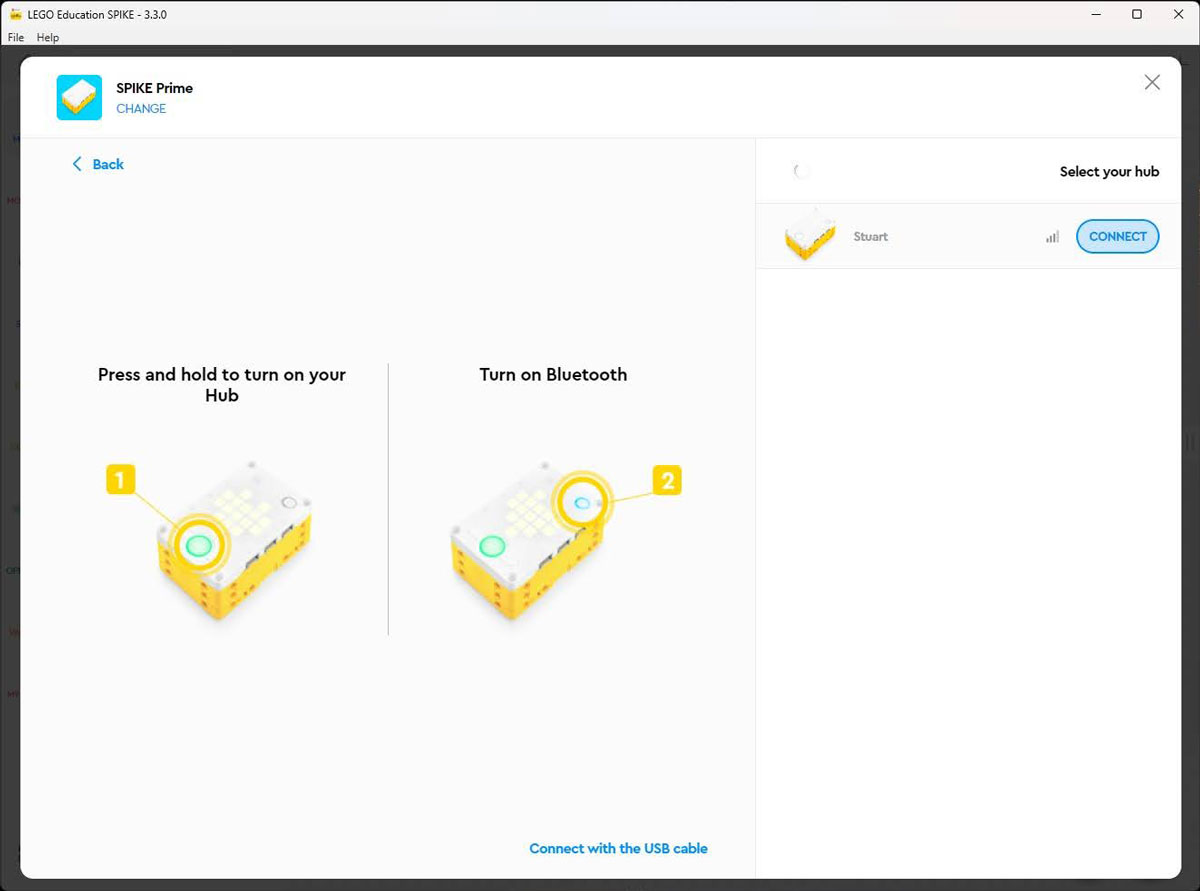
It should tell you your Hub was successfully connected.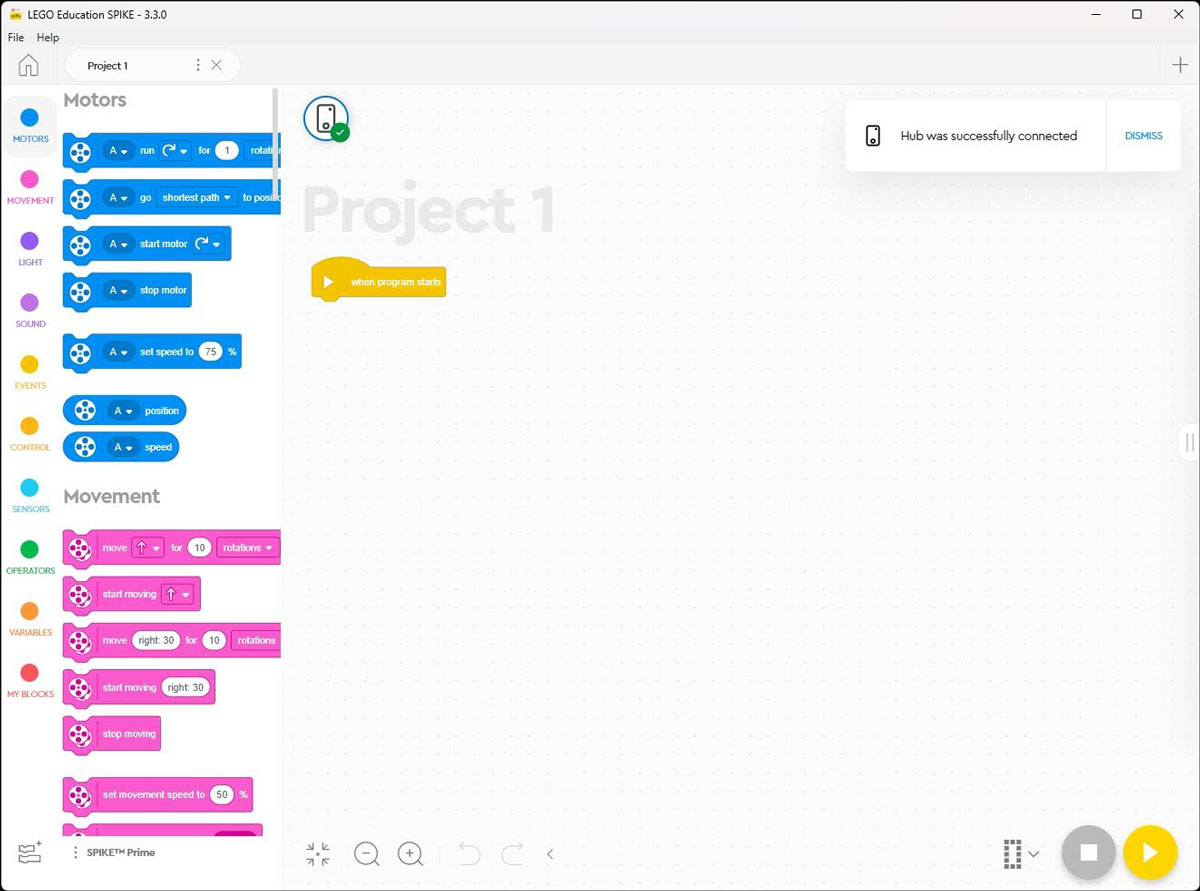
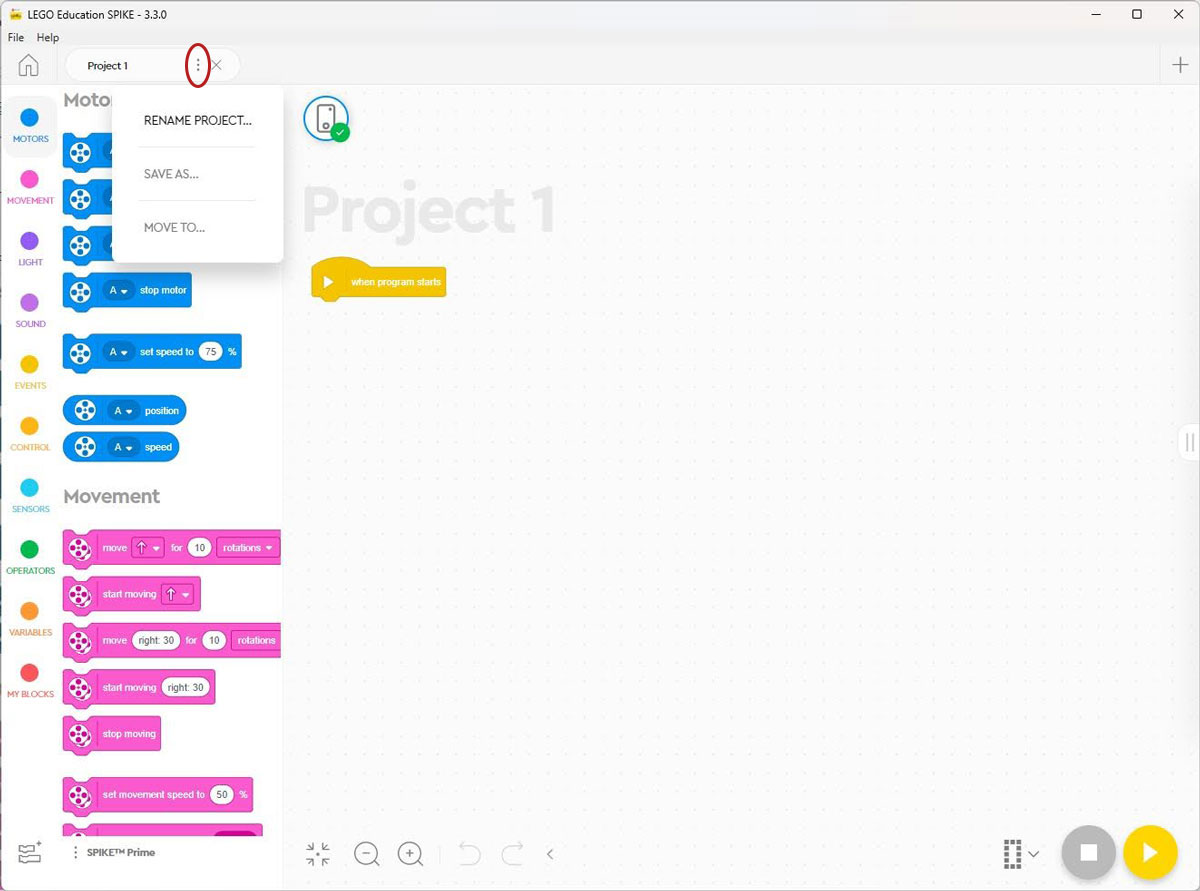
- If you did NOT name your program in Step 4, this would be a good time to make sure your program’s name is something that will remind you of the purpose of the program. To rename the program, click the 3 vertical dots in the upper left of the screen next to the project name, then select “Rename Project.” For us, the default name was Project 1.
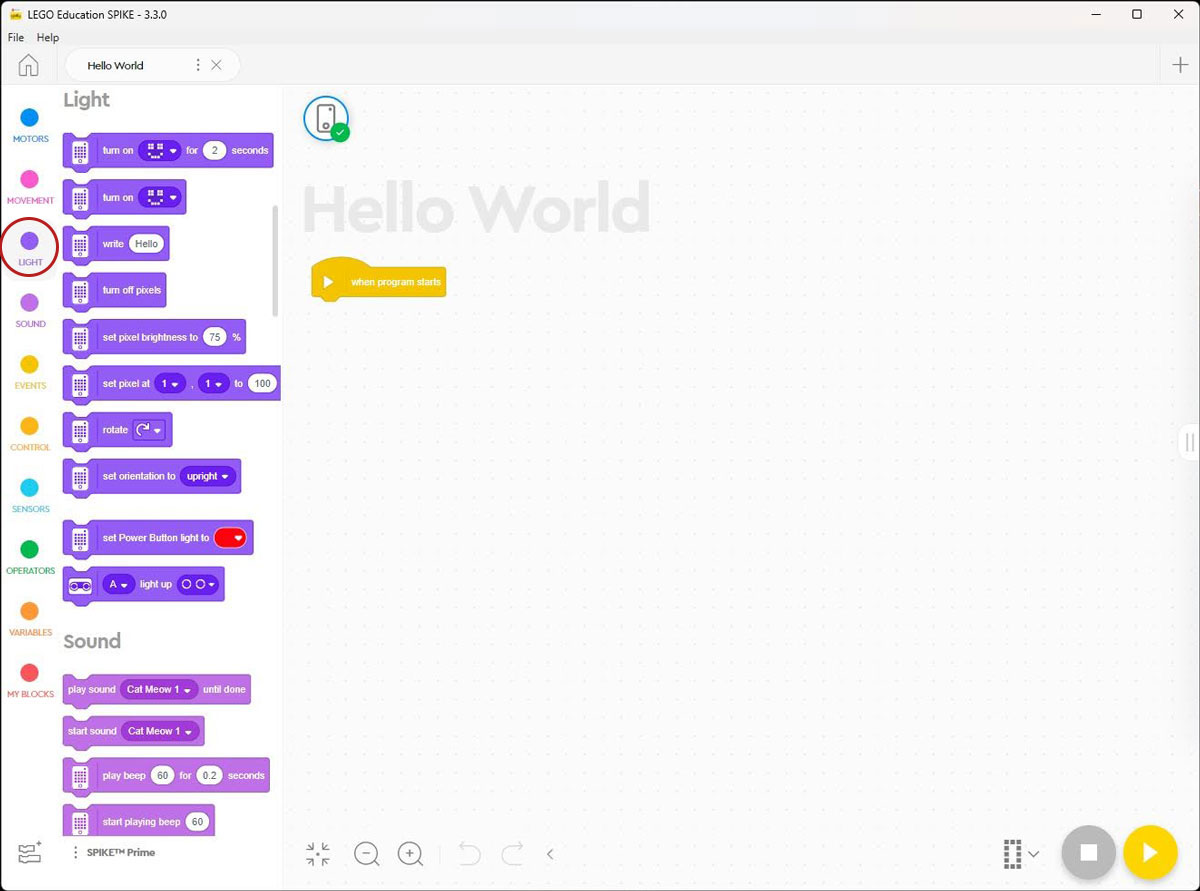
- I will call this program “Hello World” since my goal is to create a program that will display the message “Hello World” on the Hub. This is cusomarily the “first program” in every computer science class I’ve ever taken where we are learning a new language.
After you have typed in your program’s name, click “Save.”
- Next, I will click on the Light menu on the left hand side of the screen.
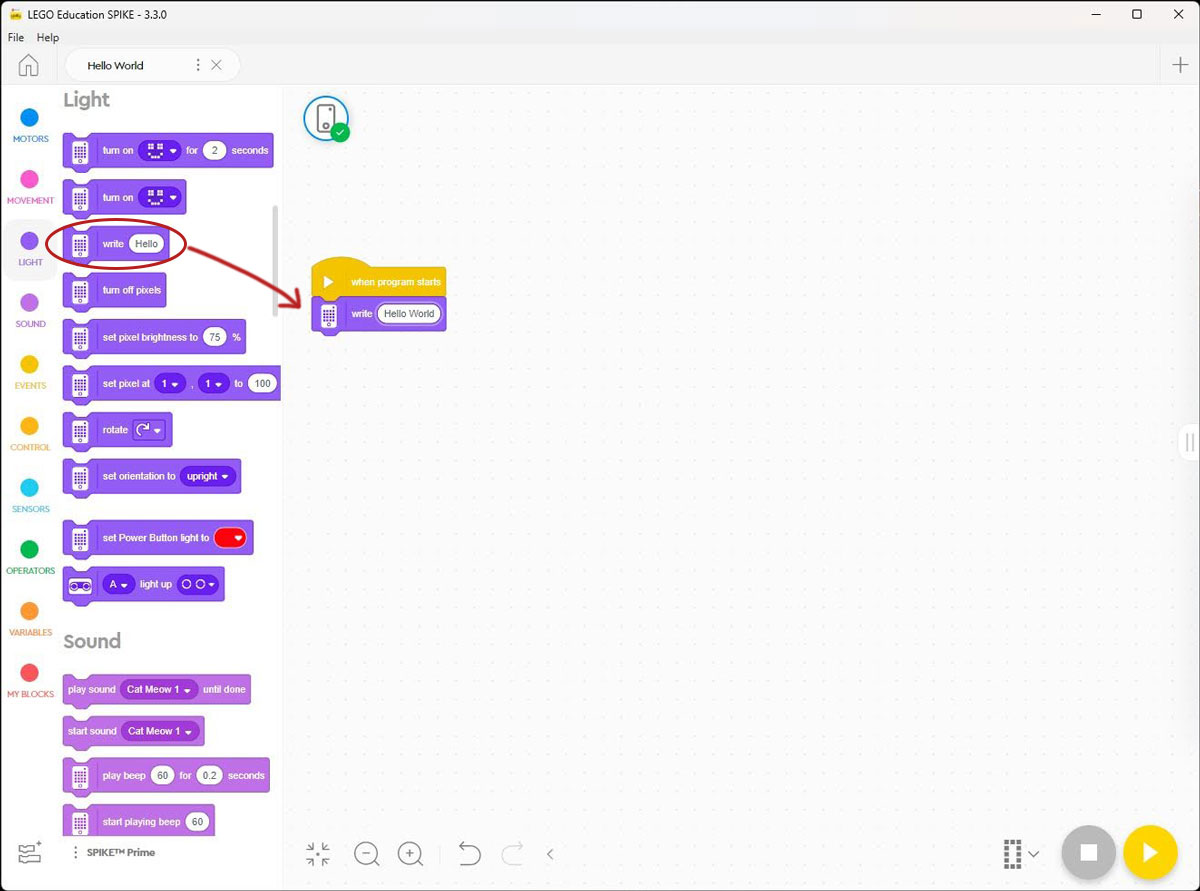
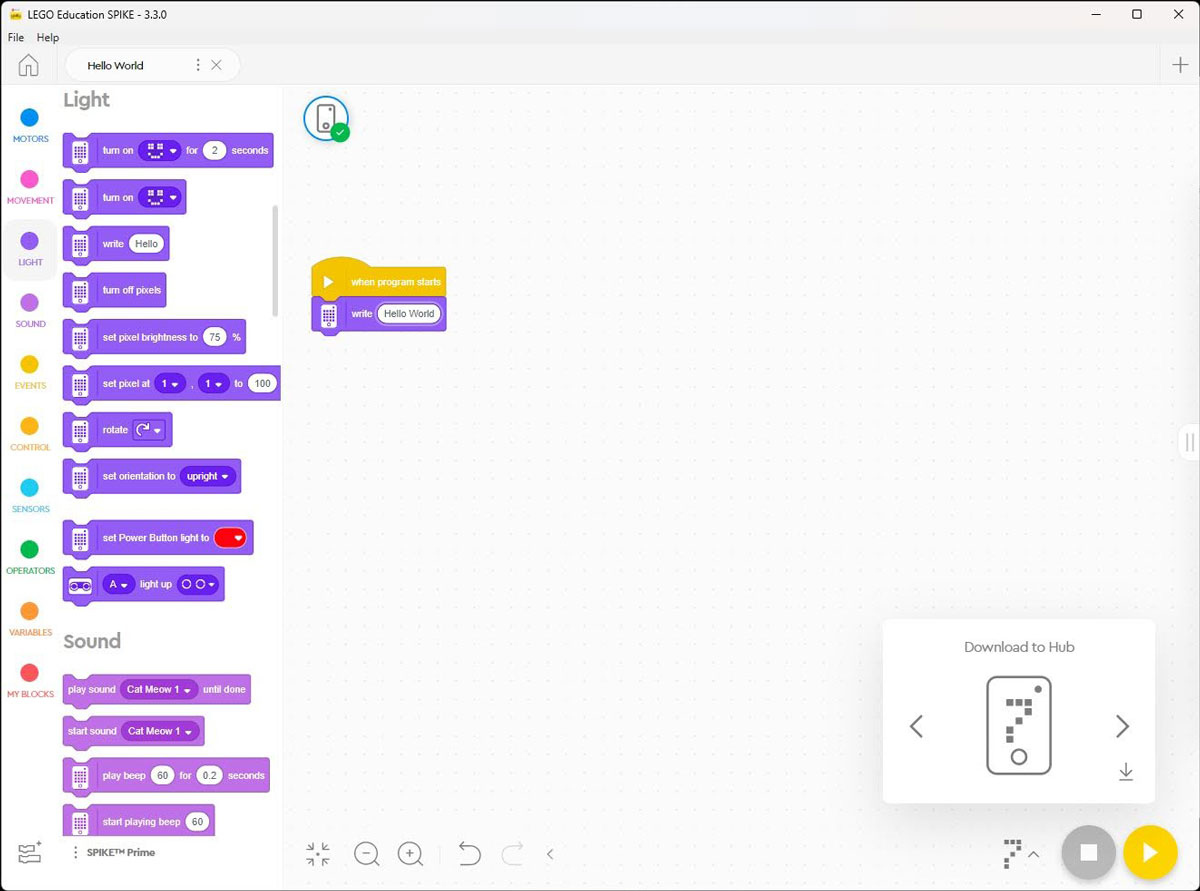
- Since I want to write a message, I will drag the “Write” block over into my program space and connect it to the block labled, “when program starts.” Then I will change the message inside to whatever I want it to say. In my case, this is “Hello World.”
- Our first program is complete! Now we just need to transfer it onto our Hub so that we can run it. A simple way to do this would just be to push the yellow triangular “play” button on the bottom right of the screen. This will transfer it over to the Hub into the slot number selected and run the code.
However, suppose we already had a program we wanted to keep in slot 0. We can change the program number by pushing the arrow to the right of the number.
- From here, we can push the arrows next to the icon of the hub to select the slot number we want. I decided to go with 7.
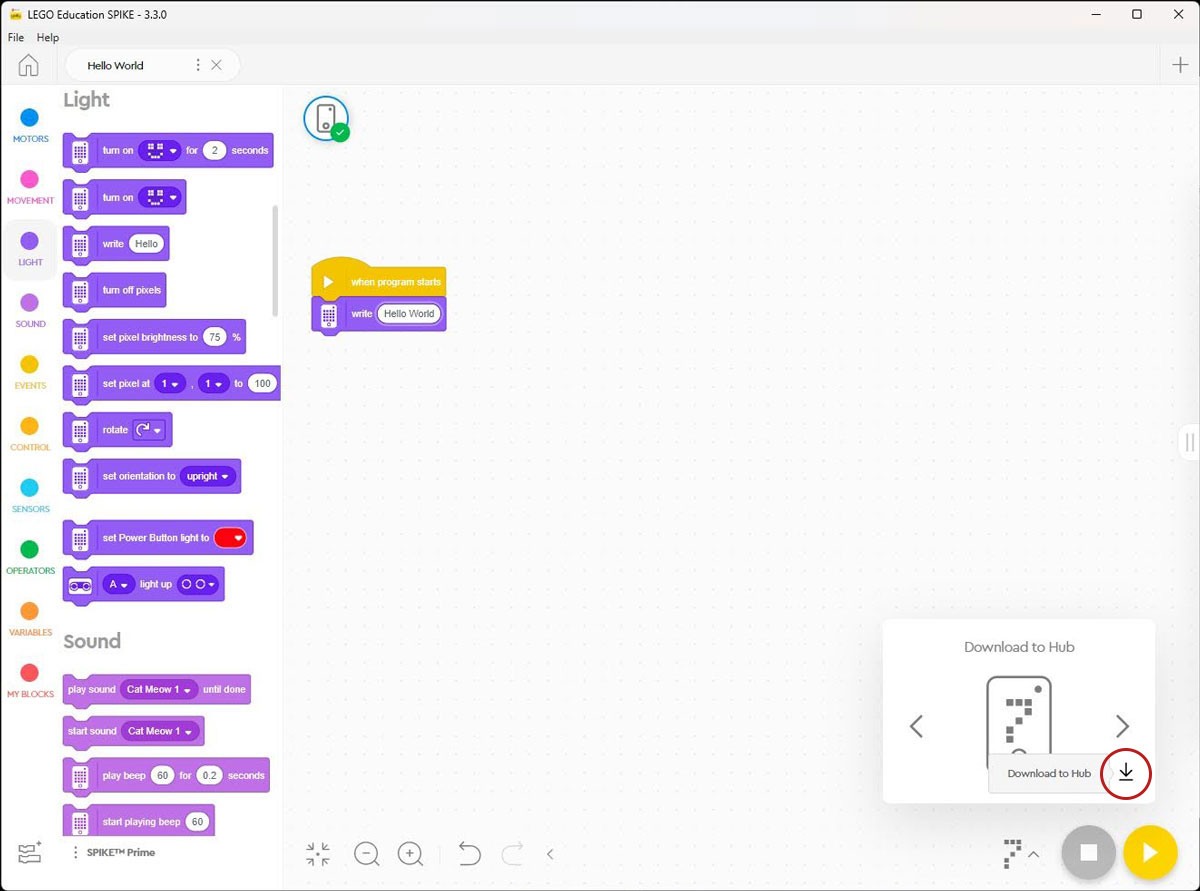
- Now when we select the yellow button, it will send the program to slot 7 and run the program. Using this yellow triangle button is probably what we want to do most of the time. However, if for some reason you didn’t want to run the program at this time, just transfer the program to run later, you can click the download button in the bottom right of the Download to Hub screen.
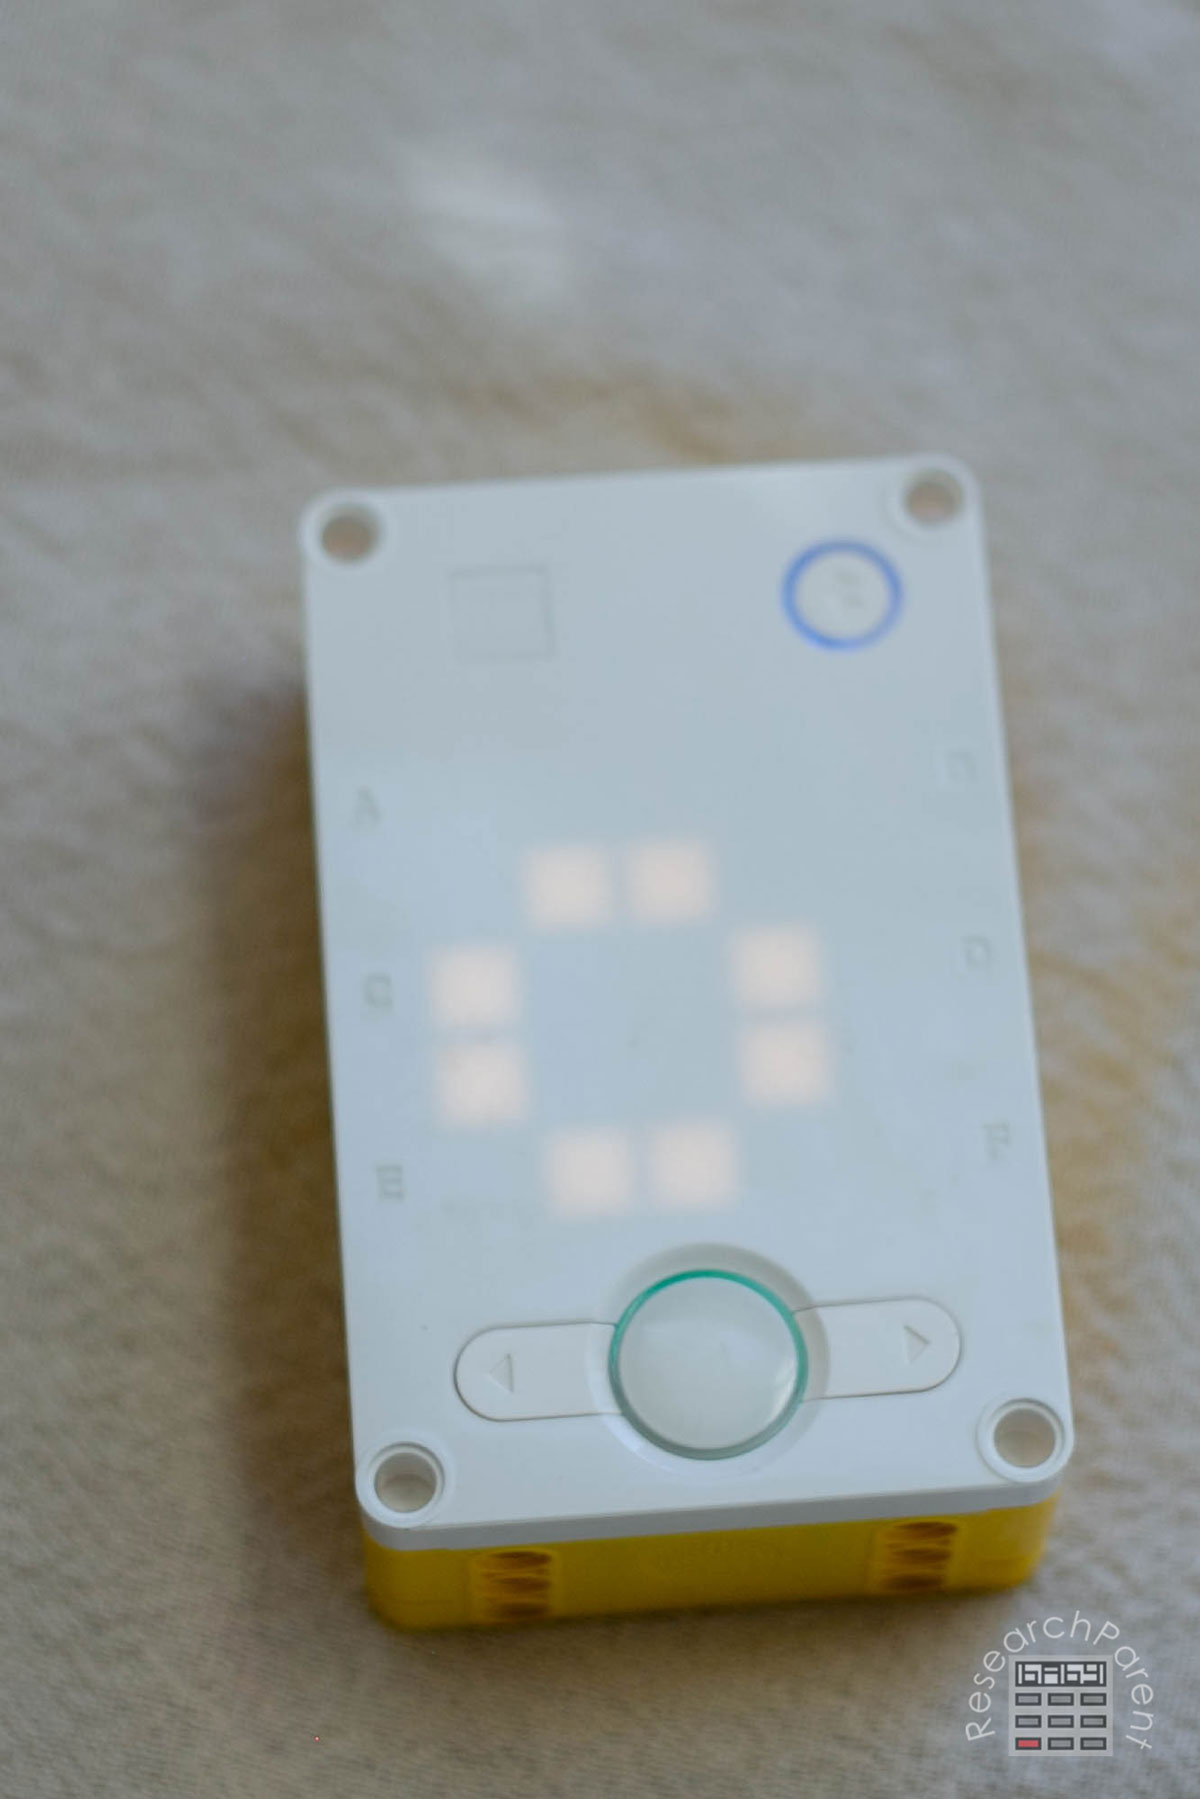
- At this point, you have the option of running the program either by hitting the yellow button or by pressing the left and right arrows on the Hub itself to select program 7, then hitting the center button to run it. When you run the program, you should see the message “Hello World” scrolling across the screen. I would recommend playing around with both methods. Particularly if you plan to compete, the kids will have to run the programs directly from the Hub and not from the computer during a competition.
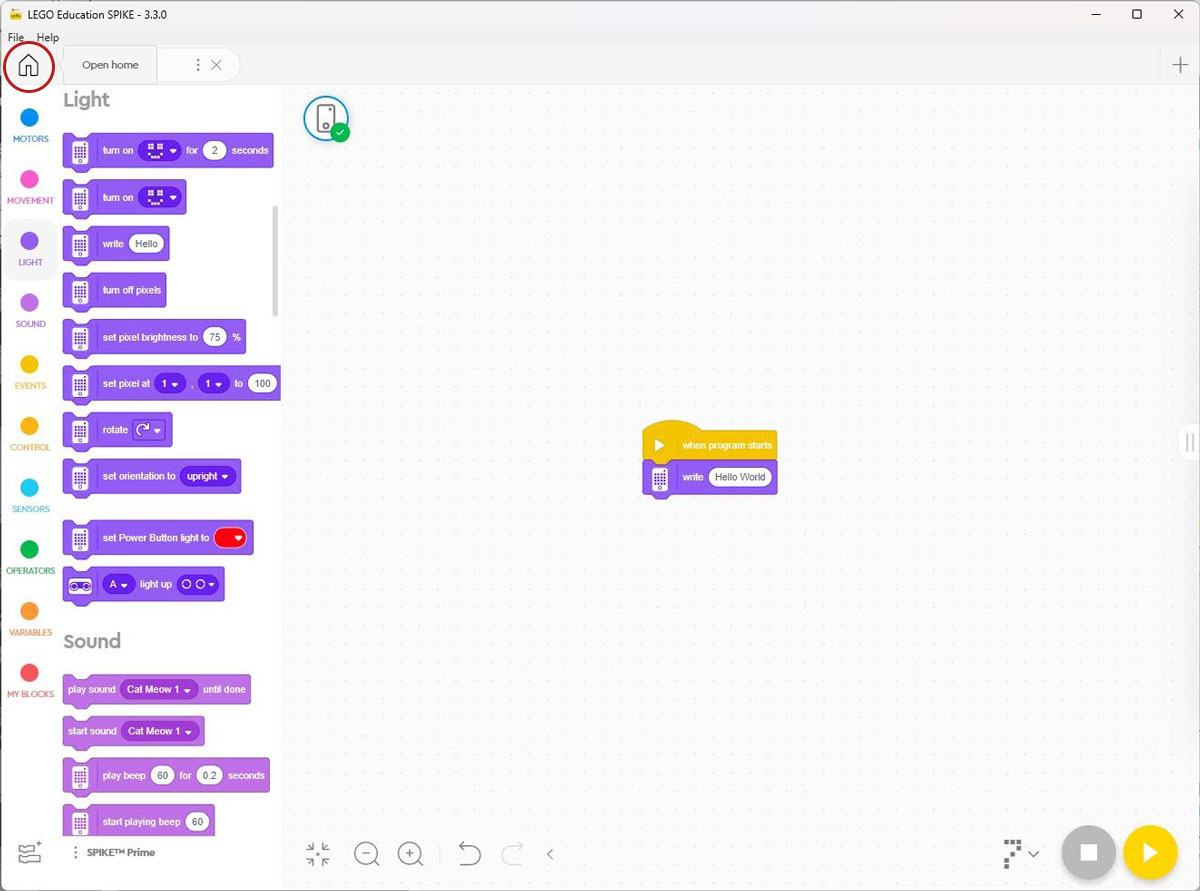
- One nice thing about the Spike Prime app is that your files will save automatically. When you are done, you can just close the window. However, I want to show you how to manage your files from within the app. Suppose you wanted to find this program months later. Assuming you are still within the file, click the house icon in the upper left to go back to the Home page.
- From the Home page, click My Projects in the left hand menu.

- From here, you will see all your programs listed. I am going to go ahead and delete all the ones I don’t want. I hadn’t realized that each time I worked on one of the tutorials, it was creating a file. Since I can go back and redo these tutorials at any time, I am going to select them all and delete them.
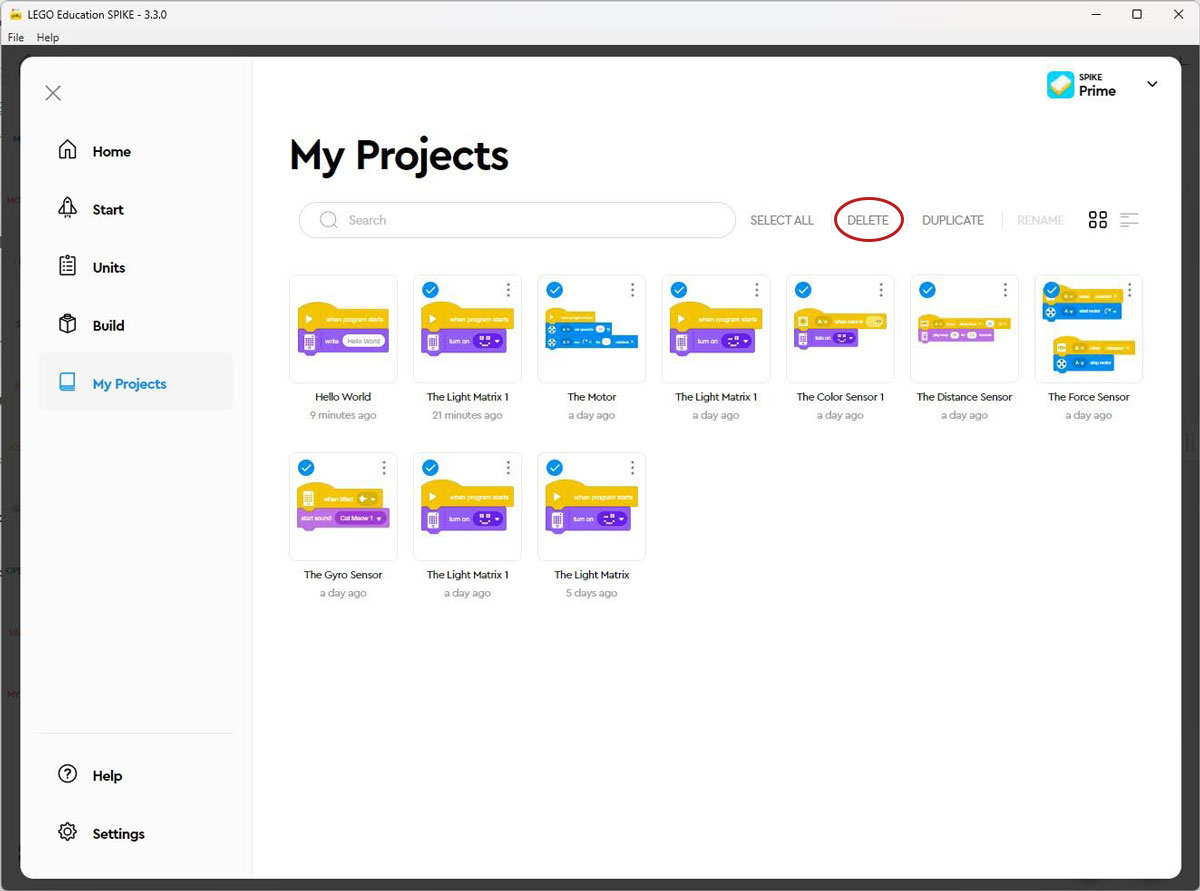
- Now your projects list should look nice and clean! I recommend doing some housecleaning reguarly to name your files and remove programs you don’t want.

Tips & Tricks
The tutorial above describes how to write and manage programs using the Spike Prime software. However, I want to also mention the shortcomings that I see with the software at present and workarounds. Some of these work arounds are based on advice from the LEGO Education help desk.
- First, there does not seem to be a way to have folders within this My Projects page. Since I have many kids and plan to have even more students writing programs for my robots once I start my team, it would be great to organize the programs by the author. To work around this lack of folder structures, I am planning to just have my kids start each program with their initials so we know whose is whose.
- Second, it seems that there used to be a way to see a list of what programs were on the Hub from within the software. However, LEGO customer support told me that they lost this functionality with a firmware update and are working on a way to add it back. In the meantime, they suggested having the program write the name of the project like we did above for “Hello World” at the start of each program. This is mildly annoying, but also a good idea while we wait for the update.
- Third, I asked if there was a way to delete programs from slots so that we would know which slots did not have programs in them. This would be helpful so that someone doesn’t accidently write over someone else’s program that they wanted to keep on the Hub. (Theoretically, overwriting programs is not a big concern, since all the programs are automatically saved within the app. If we’re doing a good job, the naming system should make the one we want easy to find and transfer to the hub again if needed.) Here is LEGO’s advice:
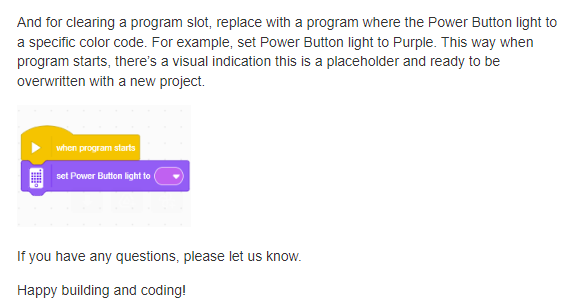
Again, not a bad idea, but also mildly annoying. I hope they update the firmware soon! Also, despite the grammar issues, I have found the LEGO customer support team to be extremely helpful and responsive, which is always encouraging.
Feel free to reach out if you have any questions! I hope this tutorial was helpful. 😊
Related Links
Science Activities for Kids
Robotics Activities for Kids
All Learning Activities

Ah, that explains why I cannot find the Manage Programs button! Thank you for including your interactions with the Spike Prime support team. It’s helpful to know what to expect in the future.
I’m glad it was helpful! Good luck!