Recently I have been working on starting a blog for my daughter so she can practice her writing and typing skills while working on her passion project. I thought I would use this opportunity to explain the steps needed to start a blog that could potentially one day make money. I’m hoping these tutorials will be useful to others. So far I have described the very first steps needed to start a blog, a tutorial on how to set up an email using your blog’s address, and a catch-all post with extra steps to make your blog more professional. In this post, I will explain the process of customizing a premium theme for WordPress to make your blog more user-friendly and attractive.
Choosing a theme is probably the most fun part of starting a blog, in my opinion. There are SO many to choose from! If you do not want to spend money on your theme, you can always choose a free one. This is what I did for my first year of blogging. The downside is that it will likely not be as flexible, fast, or mobile-friendly. After my blog started making a little bit of money, I upgraded to a Premium WordPress theme. However, now that I know I am likely going to need to update someday anyway, it may be worth your time and energy to invest upfront. This avoids having to reconfigure your site at some point in the future.
Choosing a WordPress Theme
While I recommend choosing a premium theme, I will explain here how to go about choosing either a free theme or premium theme.
Choosing a Free WordPress Theme
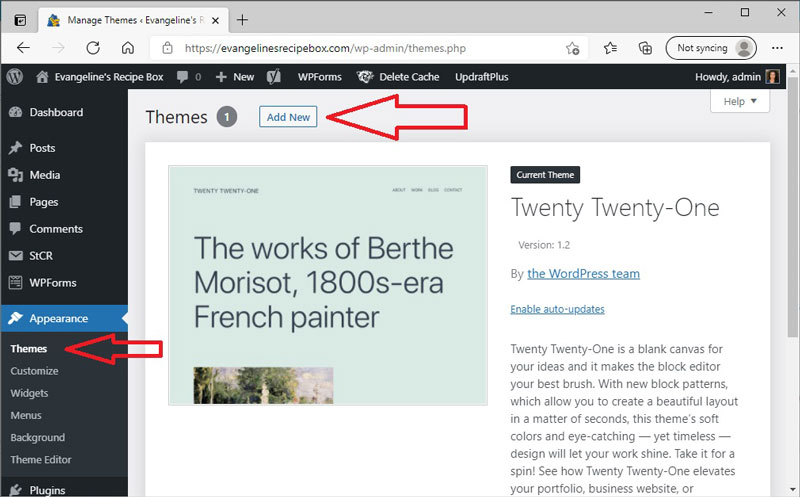
If you know that your blog is just a hobby to document your thoughts, idea, pictures, etc, and that you will never care about traffic or earning money from your blog, then a free theme is definitely the way to go. One of the best ways to find one is just to go to the Theme menu in your dashboard under Appearance and then click Add New.
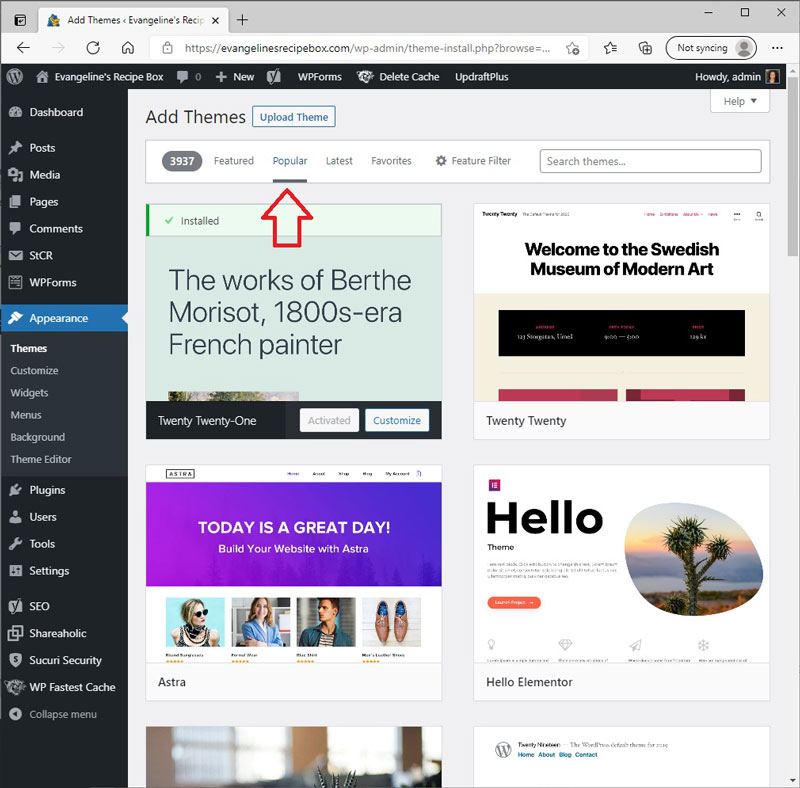
From here you will be presented with lots of options. If I click the tab at the top that lets me search the “Popular” themes, I see that there are over 3,000 to choose from.
Once you have selected a Theme, it will make changes to your site automatically to adjust its appearance. To customize it even further, you will want to go to the creator’s website to search for documentation on the particular theme you have chosen.
Choosing a Premium WordPress Theme
If you decide to go with a Premium theme, you will want to purchase this theme from a reputable buyer. I once had a bad experience purchasing a Premium theme for a friend that we found randomly off Google or Pinterest. I can’t remember. In any rate, we had to cancel the purchase. From now on, I know I will only buy a Premium theme from a site I trust.
Here are some reputable sites you can purchase Premium themes from:
- Studiopress (affiliate link, this is where I purchased mine from)
- Elegant Themes (creator of the popular theme, Divi)
- Restored 316 Designs (very feminine themes)
- Themeforest (this is a very popular place for finding themes)
It can be intimidating selecting a theme when there are so many to choose from! It is especially daunting when you consider that you are making such a big investment. Premium themes typically run anywhere from $50 to $150. As I am looking at these sites now, I see that some places are pushing you to purchase a membership or a plugin with an annual fee rather than just purchasing a theme. This gives you the flexibility to try out multiple themes, but it also means that you are now paying a yearly, rather than a one-time fee. Personally, I would rather stick with the one-time fee.
The Foodie Pro Theme
I have chosen to go with the Food Pro Theme for both my blog and now my daughter’s blog, since I already know how to use it. It is a common theme that provides a lot of customization options and is mobile-friendly. It does not need to be used for a cooking blog, as Research Parent is not a cooking blog. However, since my daughter wants to start a cooking blog, it is an obvious choice.
Purchasing the Theme
Foodie Pro was designed by Feast Design Co. and is sold at the StudioPress site (affiliate link). Because this theme relies on the Genesis Framework, to use this theme, you need to purchase two separate components:
Note that at the moment, it is cheaper to purchase these two components separately than together, because they are currently on sale. However, you may also want to check this page, which has the two items bundled together as a set.
Downloading the Theme
Once you purchase the theme, you will likely be sent links to download your purchase. However, note that at anytime in the future, you can always log back into your StudioPress account and re-download the updated files. This is a lovely feature that your purchase includes all future versions of the theme as well. Even though I purchased the theme several years ago, every year or two I log back in and download the must up-to-date version to get the latest updates.
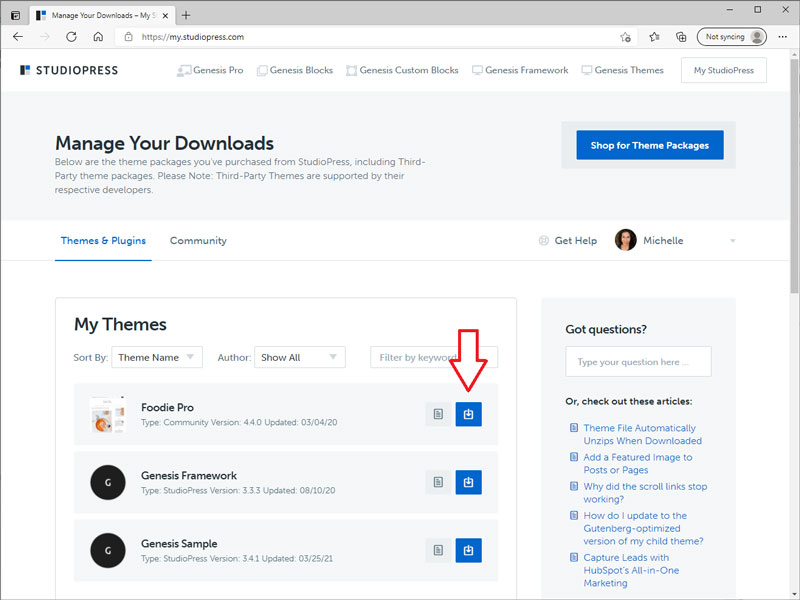
Click here to log in to Studiopress. From here you will be able to download the themes you have purchased by clicking on the blue download buttons next to your purchases.
Make sure you know where these files are saved on your computer. My browser automatically saves them to my Downloads folder, so I am going to move them to a folder I have specifically created on my laptop for blog-related files.
Installing the Theme
In order to install the theme, I am going to be following the instructions found on this page.
Installing Genesis Framework
The first step is to install, but not activate the parent theme, which is the Genesis Framework. I feel the instructions the above site provides on how to do this are pretty clear.
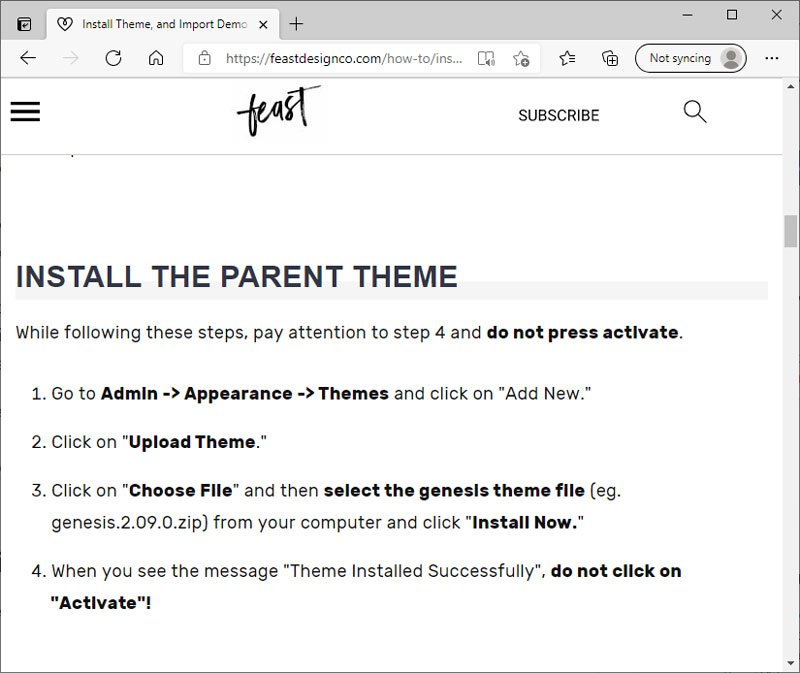
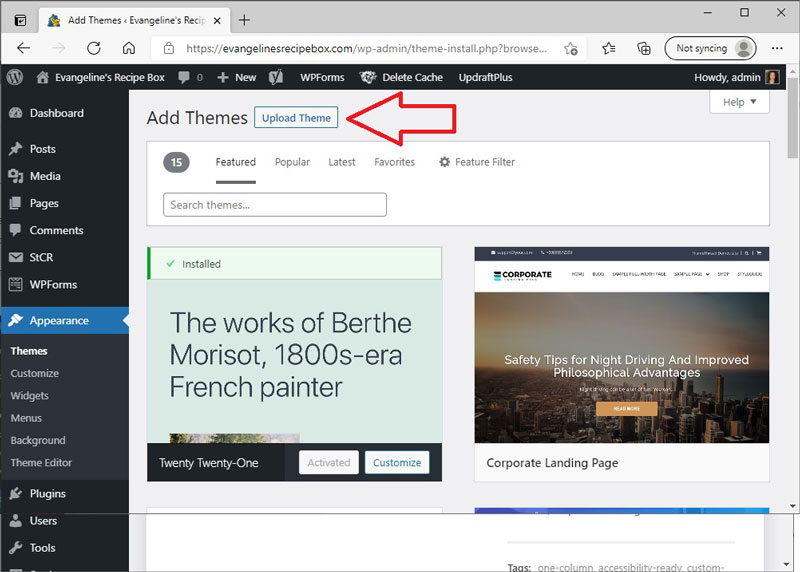
From the left hand menu of my WordPress Dashboard, I am going to click on Appearance, and then themes. From there, I can click the Add New button as I did when I was looking for a free theme.

From here I can select Upload Theme.
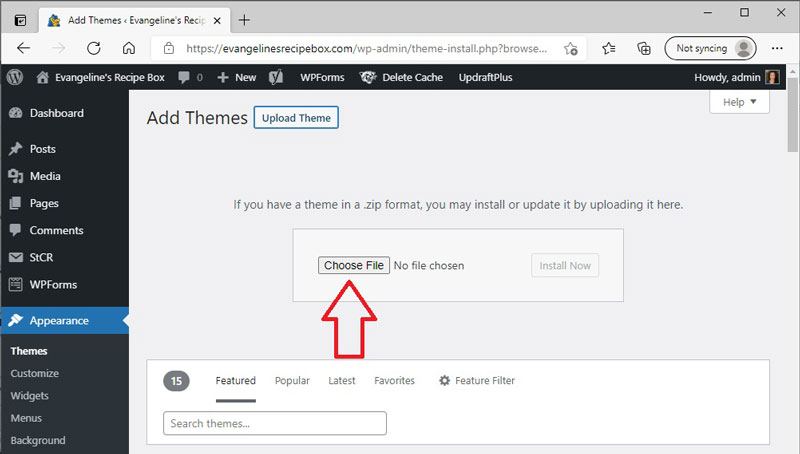
From here you will click Choose File, then select the file genesis.###.zip. The ### will be replaced with whatever the current version number of the Genesis Framework. Be sure that you select the genesis file and the genesis-sample file. Once you have selected the correct file from your computer, click Install Now. Once it is installed, DO NOT ACTIVATE this theme.
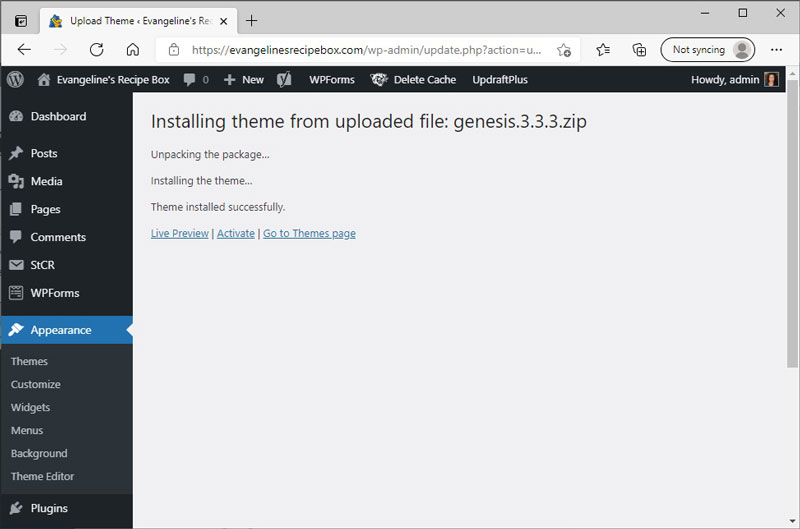
Once you have successfully installed the theme, you should see a screen something like this. Again, do not hit activate!
Installing Foodie Pro
Installing your child theme, Foodie Pro, will look very similar to the procedure we followed above for Genesis. The only difference is that this time when you choose a file, you will select foodiepro-###.zip where ### is the version number and name. Mine is “v440 – Coffee and Canada.” Also, once this one is successfully installed, you will click Activate!
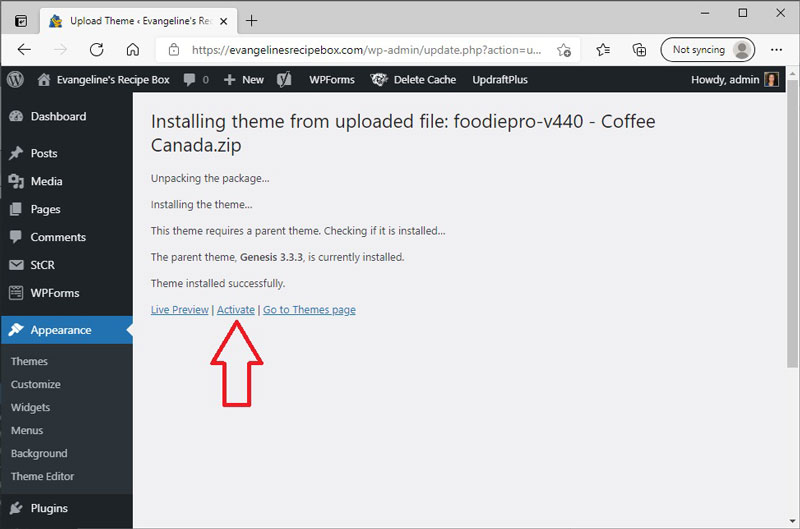
You can check out your site and see that it already looks different, but you will want to customize it.
Customizing Foodie Pro
Once Foodie Pro is installed, you can follow the designer’s tutorials here: https://feastdesignco.com/how-to/foodie-pro-tutorials/ to customize your theme.
Install Necessary Plugins
Before you install the demo content, you will need to import and activate the following plugins.
- Widget Importer and Exporter
- Genesis eNews Extended
- Simple Social Icons
- Yoast SEO Plugin (which I already have installed)
- Regenerate Thumbnails Advanced
- ShortPixel image optimizer (this one will require you to request an API key to use it)
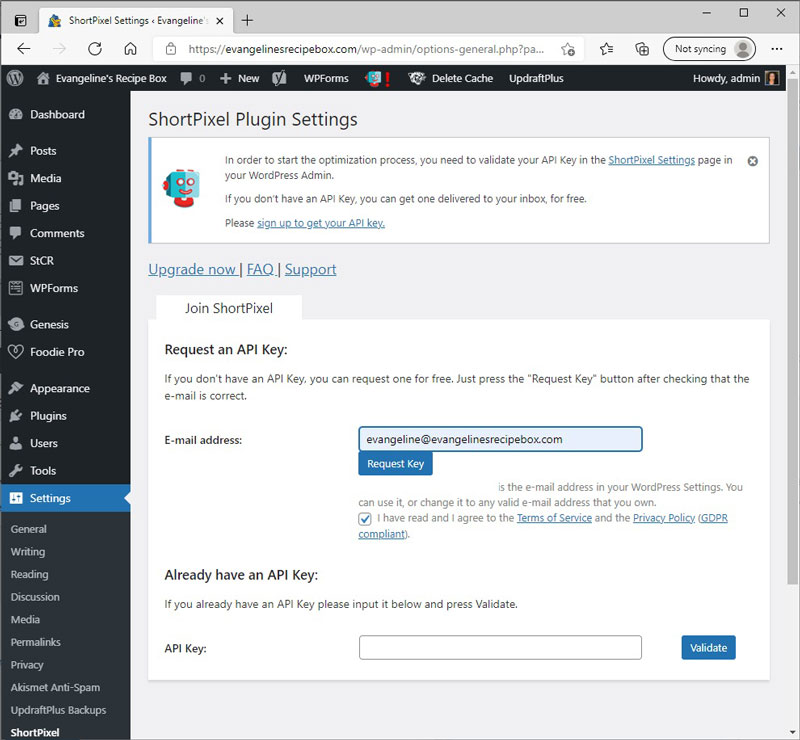
This can be done by going to the Plugins section of the left hand dashboard menu. Then click Add New and search for the plugin. Click Install Now, then Activate.
Importing Demo Content
Many themes come with some demo content that you can install if you are starting from scratch so you can see how your site will look once you add real content.
You do not need to install the demo content. Many of the pages, posts, and categories that are created during this import, you may want to delete at some point. You can skip this step and just start creating content. However, if you do not have content and you want to get a sense of how your site will look as you add content, this will give you an idea of how the website will look.
To install it you will want to go to the folder where you downloaded the zip file for Foodie Pro. At the time of this writing, the file was called, foodiepro-v440 – Coffee Canada.zip. You want to unzip this file. To do this on a PC, you can right click and select Extract All…
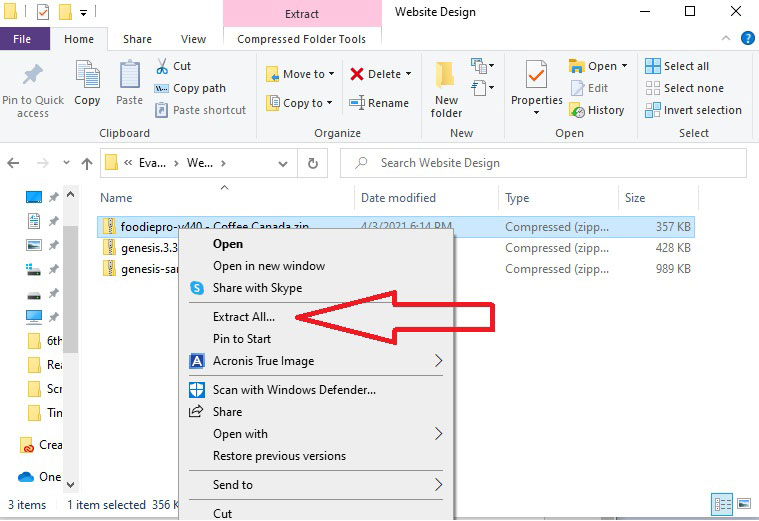
Once the folder is unzipped, inside you will find a file called foodiepro.xml in the foodiepro-v440/sample-data folder. In order to install this demo content, you will first need to install the WordPress Importer. This can be found in under the Tools menu on the left hand side of the dashboard, under the Import section. Click Install Now under where it says WordPress.
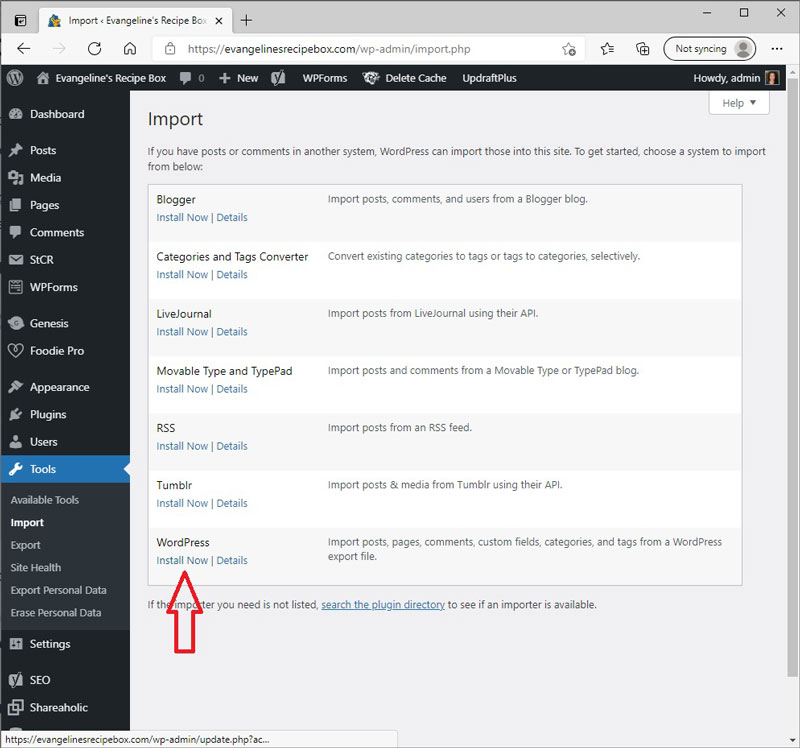
The words will change to Run Importer. Click Run Importer. Then click Choose File.
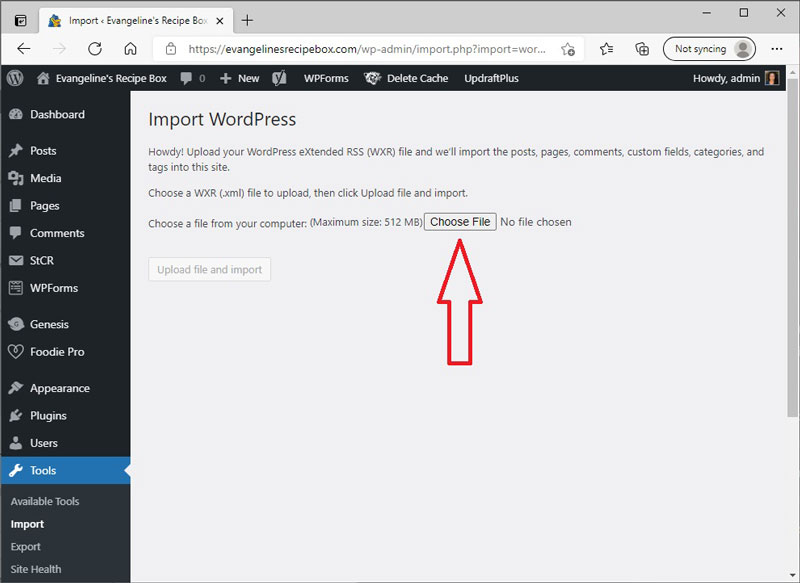
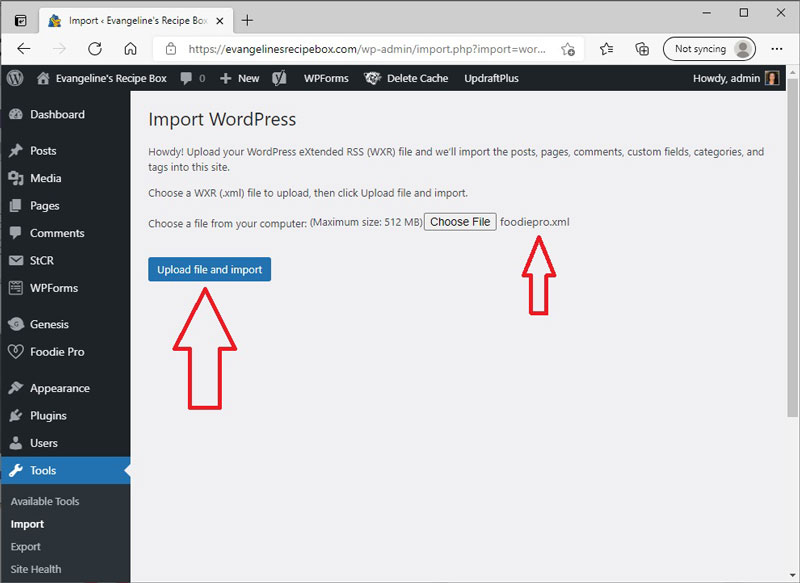
Locate the file called foodiepro.xml from the folder you unzipped earlier. Then select Upload file and import.
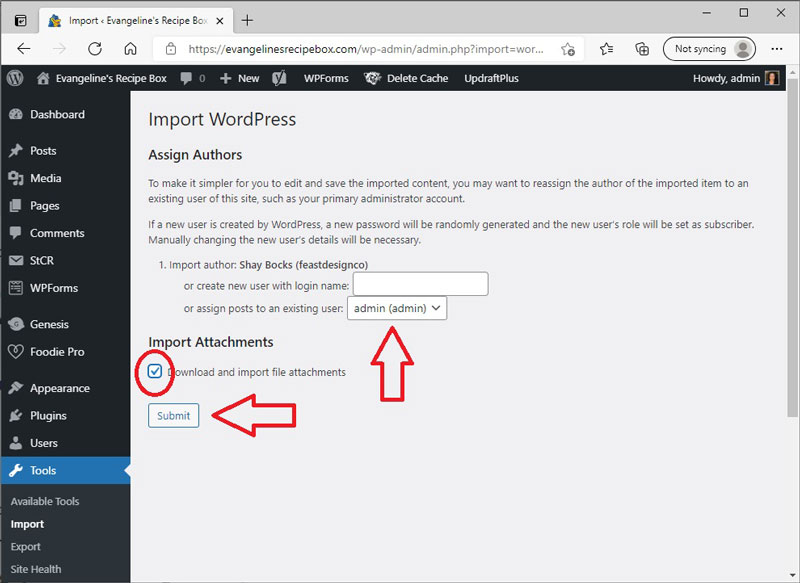
You may want to reassign the author of the imported content. I selected the already existing user, admin. I also checked the box to download and import file attachments. Then click Submit.
Note that a lot of the pages, posts, categories that are created you may want to delete at some point, but for now, it will give you an idea of how a website with content could look.
Installing the Widgets
Another handy feature, if you want to see how your website could look, is to use the widget importer to automatically set up some widgets. Widgets are just a way to customize the way your site looks in terms of the header, footer, sidebar, and homepage. The option that I prefer is to choose the exact ones I want and customize these on my own. However, for my daughter’s site, I am going to use the importer to see what the Foodie Pro designer, Shay Bocks, recommends.
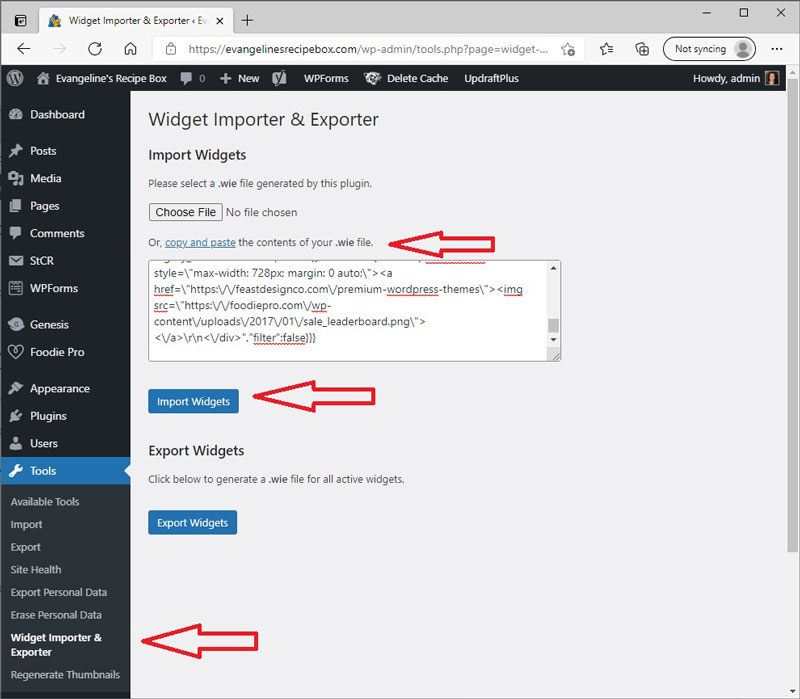
To do this, I will go to the Tools menu on the left hand side and select Widget Importer and Exporter. From there, select copy and paste, then copy in the contents of the foodieprowidgets.wie file from the same sample-data folder in the foodiepro zip file you extracted earlier. (Note: I tried importing the file directly and it didn’t work, but I had more luck when I copy and pasted the contents after opening the file in Wordpad.)
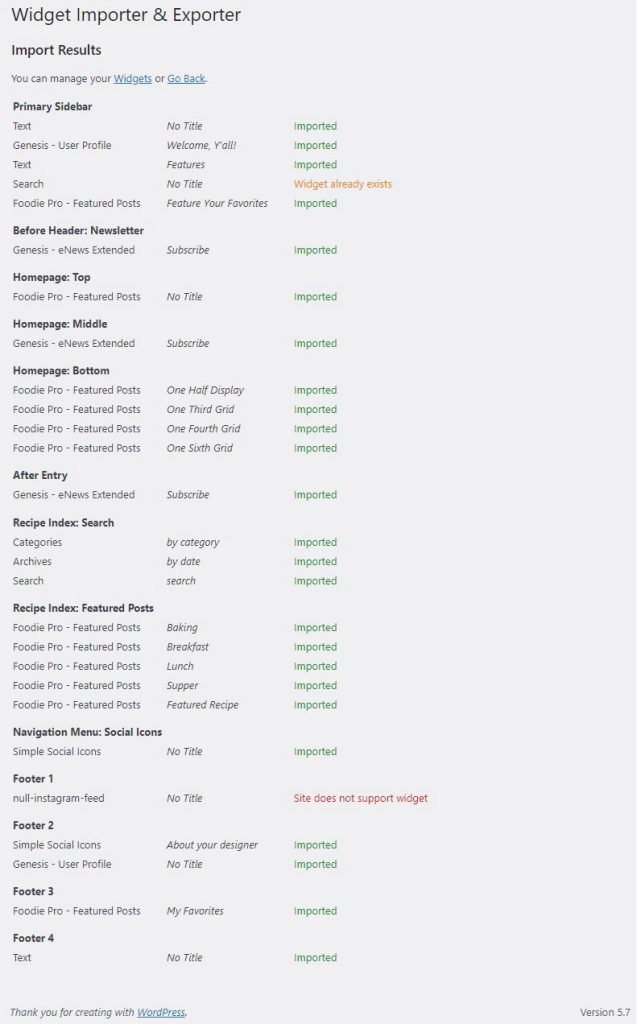
Once the widgets are imported it will show a list of all the changes that were made.
I happened to notice that importing the demo content and widgets changed my permalink structure back to including the date. To change this back to postname, go to Settings in the left hand dashboard menu and select Permalinks.
Import Header Logo
To install a new header logo, go to Appearance in the left hand side of the dashboard, then select Customize.
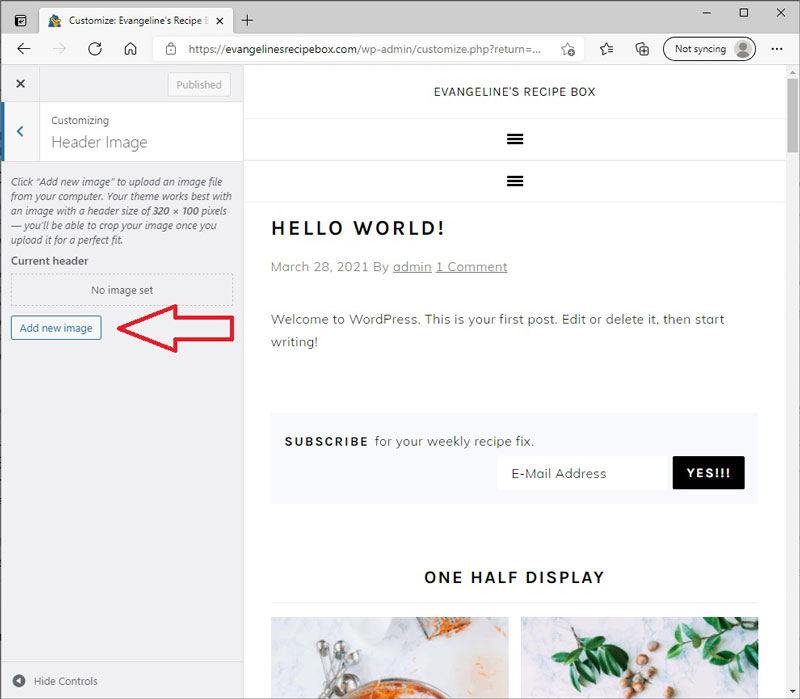
Since the file that the theme was previously using had a width of 640 pixels, I made a logo that had a width of 640 pixels as well.
Additional Customization
At this point, you have a website with demo content that looks like a real website. You can now customize it to your heart’s content. Here are some of the changes I recommend looking into.
Customize Widgets
In the Appearance menu on the left hand side there is an option called Widgets.
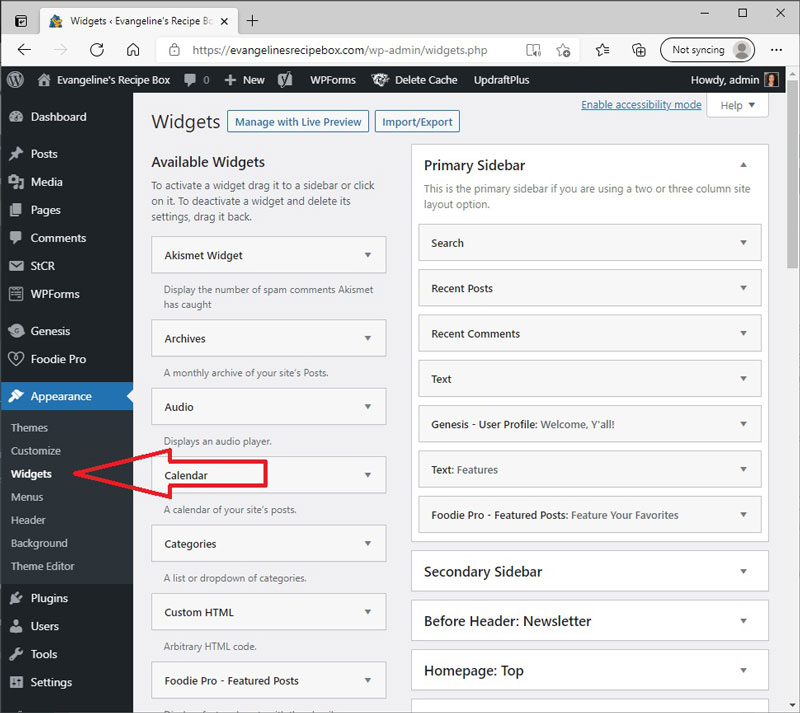
Before Header
In the Before Header section, the theme places the Genesis eNews Extended widget to collect subscriber email addresses. This is a great idea if you plan to try monetizing your blog one day, but you will need to sign up with a service to collect these addresses. Otherwise, they will not be stored anywhere. One service you can use is MailChimp.com. Mail Chimp is free for up to 2,000 contacts, which is great if you are just getting started.
Here is an article that explains how, once you have signed up for a MailChimp account, you can connect it with Genesis eNews Extended. I will be following this tutorial to update the widget that was preconfigured in my Before Header section, so that it collects email addresses. I am not going to provide a step by step tutorial here as I feel that link is very clear. I was surprised by how quick and easy this process was. It took less than 5 minutes and mainly involved copying and pasting a URL from MailChimp into the Action box of the Genesis eNews Extended widget.
Primary Sidebar
Here are some changes I made to my Primary Sidebar. I’m sure this will change over time, but this is how I customized it to begin with
- Deleted Recent Posts widget
- Deleted Recent Comments widget
- Deleted the text box that was a Foodie Pro Ad
- Modified the Genesis User Profile so that it had different text and pointed to a different page. I also plan to create a new user with the website’s email address and go to gravatar.com to create a different picture for that email address. I also moved this widget above the Recent Posts widget.
- Deleted the text box called Features
- Added a Genesis eNews Extended subscribe box and configured the same as the one in the Before Header section
- Added a Simple Social Icons box and added in all the appropriate URLs to my social media accounts.
Navigation Menu
The Navigation Menu comes prefilled with a Simple Social Icons widget. All you need to do in this widget is fill in the correct URLs for the social media links you want to include.
Footer Menus
Due to a widget that didn’t import properly due to it no longer being supported, I recommend dragging a blank text box into Footer 1. This will allow the other footer widgets to show up, which you can customize as you desire.
In Footer 2, I changed the “About the Designer” to “Let’s Connect” and then updated all the links in the Simple Social Icons widget as I did in the Navigation Menu. I also updated the Genesis User Profile as I did in the sidebar.
I deleted the text box in Footer 4, since it was just an add for the theme.
Later I decided I wanted to add a Genesis eNews Extended subscribe box to my footer as well, so I moved the Foodie Pro Featured posts to Footer 1 and changed it to be a one sixth grid with 6 posts showing. Then I added a Genesis eNews Extended widget to Footer 3 and customized as above.
Customize Menus
To customize your menus, you will click on Appearance on the left hand side of the dashboard, then Menus.
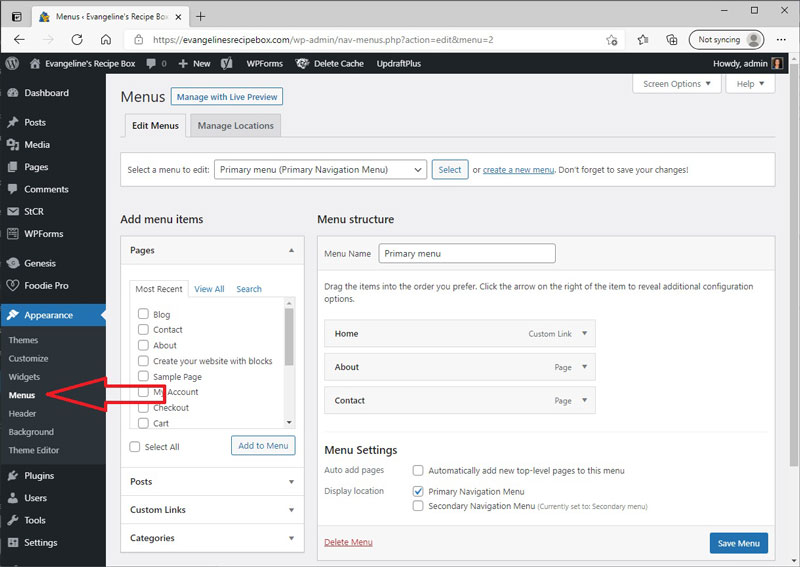
One of the changes I know I want to make right off the bat is that I want to go back in my Settings on the left hand side and set my homepage to static in the Reading section.
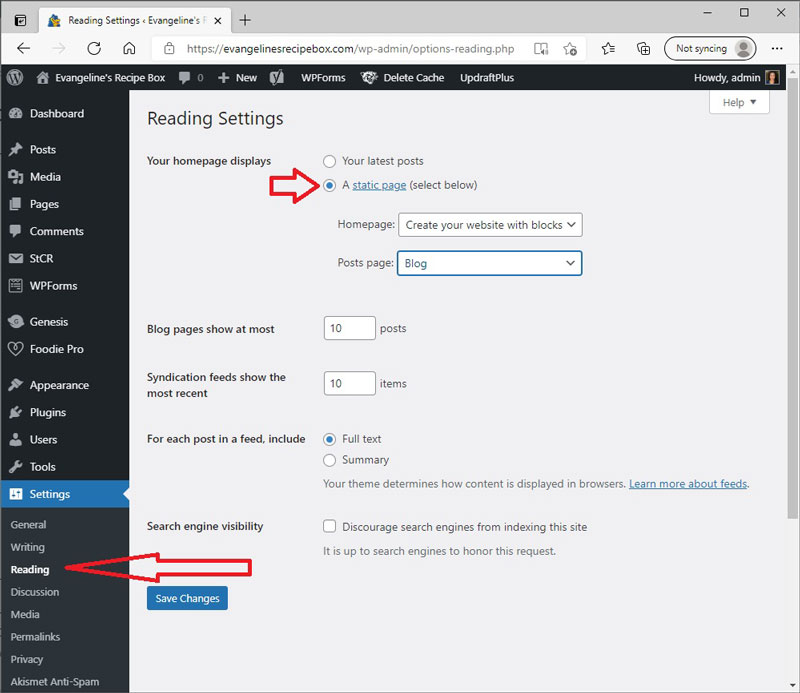
I do not think it matters what page is used as the Homepage, since Foodie Pro uses widgets to define the Homepage. However, the Posts Page is a page with a URL that will show all the latest posts. This might be a good thing to link to on the primary navigation menu. If you want to customize the way this “Posts Page” appears, you can change it in the Customize menu under Appearance. Select Theme Settings, then Content Archives. From here you can choose how many columns to use on this page as well as whether or not to show the title, features image, etc.
Another change that I made is that I switched to the secondary menu that was set as the Secondary Navigation Menu and I unchecked the box that set it as the Secondary Navigation Menu. This got rid of the social media menu bar at the top which I felt was unnecessary and added clutter.
“Starting a Blog” Series
This post will be part of a multi-part series! I will add links as I write and post these articles.
- Part 1: How to Start a Blog for a Kid
- Part 2: Setting Up HostGator Email
- Part 3: I’ve Set Up My Blog! Now What?
- Part 4: Customizing a Premium WordPress Theme (this post)
- Part 5: Monetizing Your Blog


Leave a Reply